Friday, November 29, 2013

Kitchen Makeover (on a budget) pt 1

There is something about this time of year that really makes my nesting instinct kick in. I want cosy. I want comfort. And most importantly, once December kicks in I want sparkle, twinkle and glitter...

Food is very much a focus over the festive period too (which, in this house at least, runs from the beginning of December all the way through to the second week of January! ) which means spending more time in the kitchen so if there's one thing I don't want it's a messy cluttered kitchen!  Unfortunately my kitchen, tiny as it is, has a tendency to get messy AND cluttered whenever I turn my back for 5 mins.

Time to take things in hand!

I wasn't intending on redecorating the kitchen this winter (to be fair I was actually intending to do it during the summer but just never got around to it...) but, well the urge took hold and sometimes you just have to go with the flow.

I simply don't have the time to do the whole lot in one hit so I have decided to tackle one wall at a time and work my way around.  This week I did the window wall.


Here's how it looked before - the yellow seemed like such a good idea at the time but the kitchen (like the rest of the house) just doesn't get enough light so instead of looking warm, bright and sunny, most of the time it just looks a bit dark...


One coat of paint (Dulux Natural Calico if you were wondering) and it's already brightened up a bit. It makes the white boiler look less conspicuous too which can only be a good thing...


I picked up this corner unit from a charity shop for £2. A couple of coats of Annie Sloan Chalk Paint in Old White transformed it. I love chalk paint - you can pretty much paint anything with and, although a bit pricey, the tin just seems to go on forever!


It scrubbed up lovely don't you think? I am currently loving the red, white and sky blue colour scheme but the best thing about a white back drop is it's easy to change accent colours when I fancy something different.


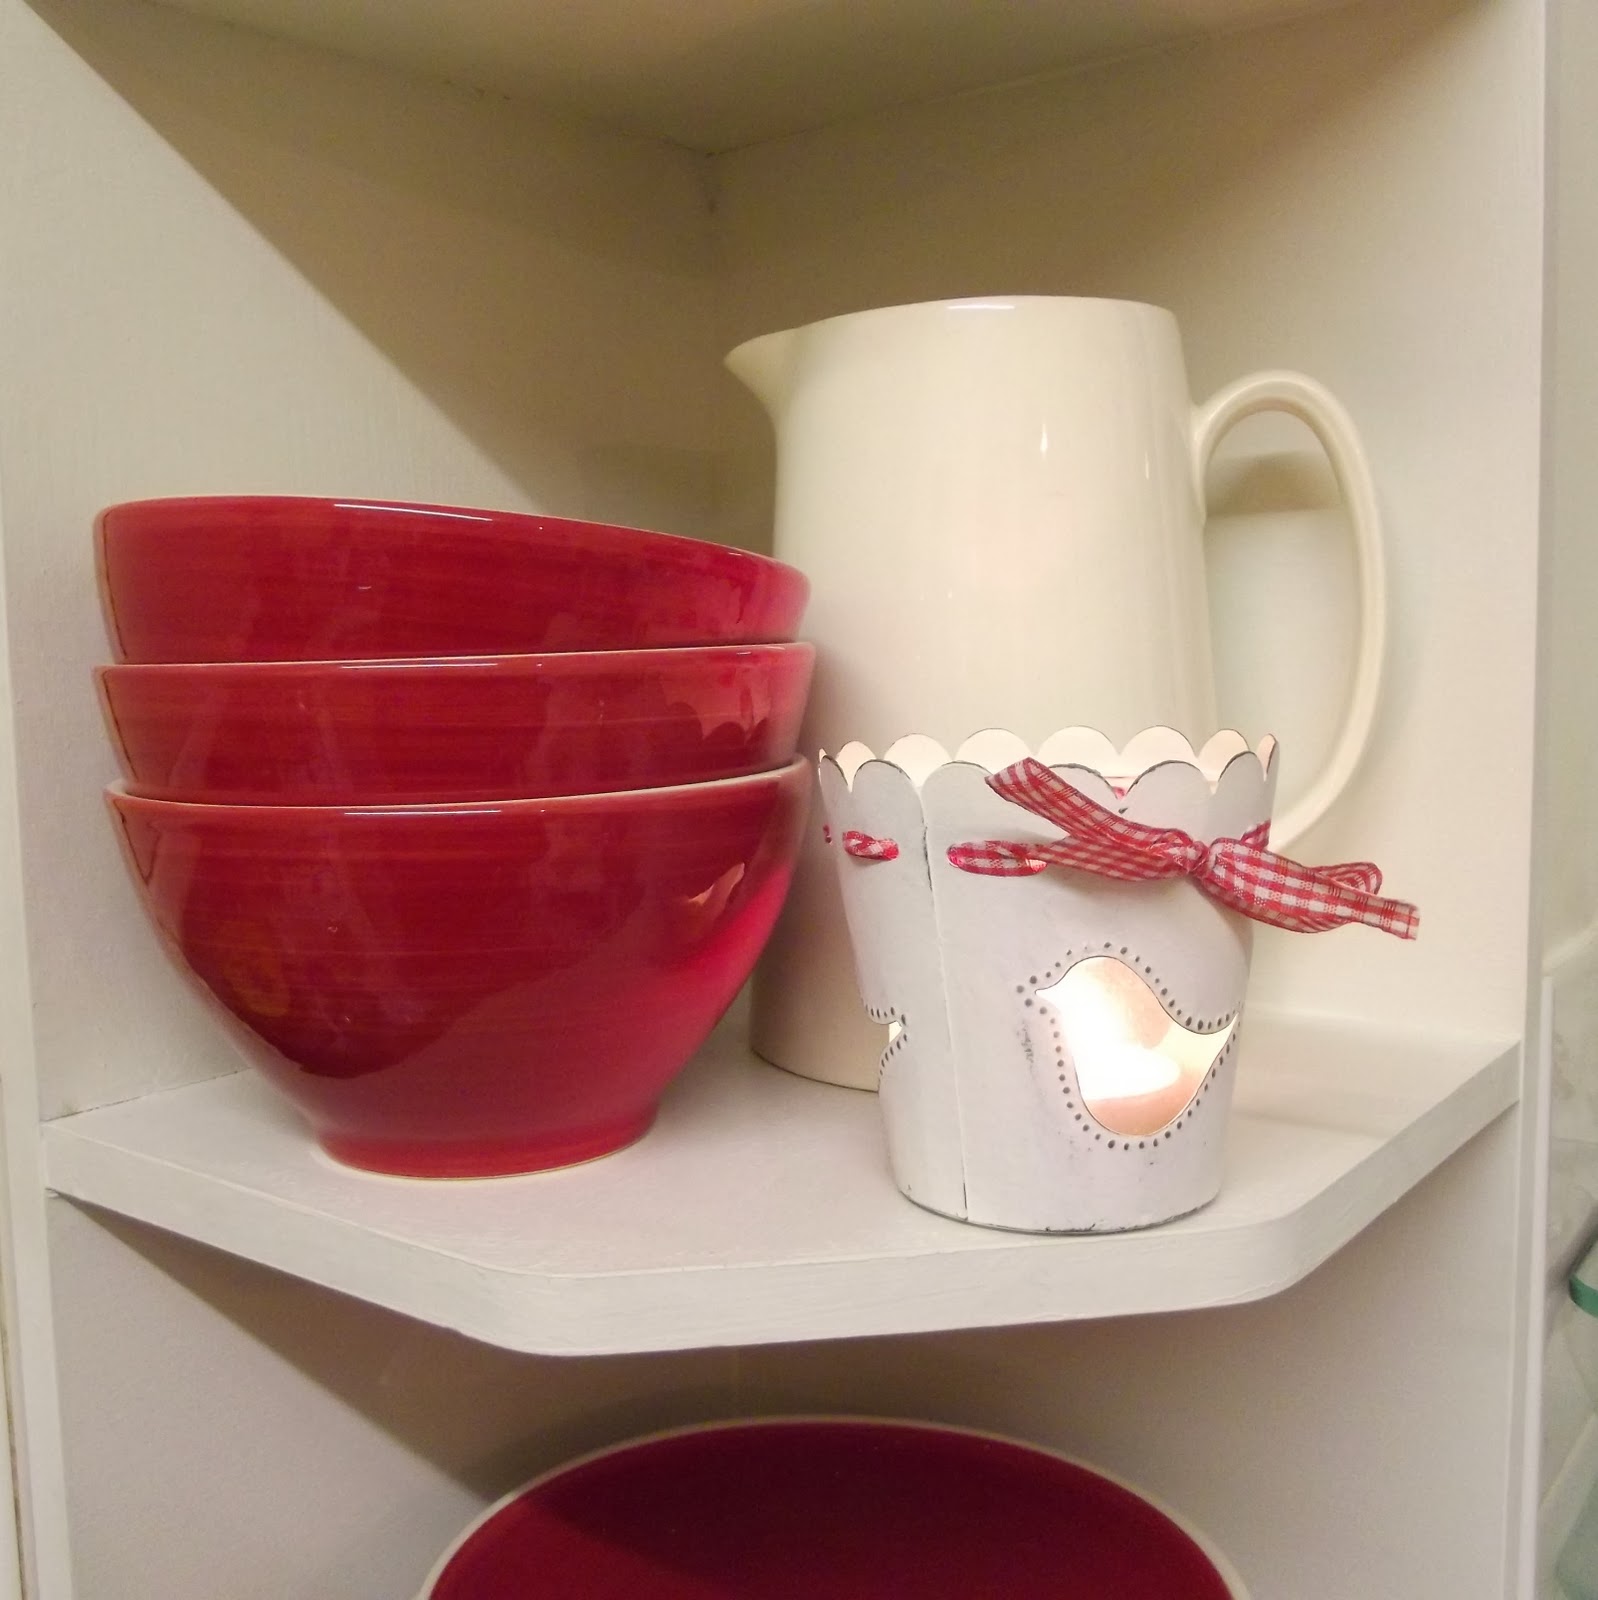
The red and white crockery is from Matalan. The cute little birdie tea light holder was purchased in the sales after last Christmas and the lovely tall pitcher was a charity shop find.


My lovely little white witch was a Christmas present a couple of years ago. She's now hanging in pride of place and watches over me while I do the washing up.


 These two glass shelves came from my mum. I've used little pressed glass sundae dishes (another charity shop find) as supports. There is just enough room to display a few little trinkets I picked from elsewhere in the house. I will probably put some pots of herbs on the top shelf in the summer but it will, very soon, make a perfect stage for Christmas candle holders, pine cones and glittery reindeer...


It's amazing what a transformation can be made with a bit of paint and lot of de-cluttering!

The rest of the kitchen still looks rubbish but now I've made a start I'm itching to carry on. Hopefully I'll be able to show you Cute Kitchen Makeover part 2 next week...


Candle light and disco ball fairy lights.
Just because!


Tuesday, November 26, 2013

Scrummy Chocolate Orange Cake recipe

You may have noticed I have a slight obsession with traditional home baked cakes and puddings.

Duerr's - producers of jam, marmalade and peanut butter of extreme yumminess who have already featured a couple of times on this blog - have obviously noticed this too and sent me some more of their lovely jams and asked me to test out a few more recipes from their 'Baking for Boys' series on YouTube.

I was more than happy to oblige!


Last weekend we made the gorgeous Victoria Sponge with Raspberry Jam and Cream - it was lovely. In fact it was so lovely we kind of got carried away and ate it all before I had a chance to photograph it for bloggy purposes... oops!

On Sunday we were heading over to the inlaws for a family Sunday dinner so I thought it would be the perfect opportunity to try out another recipe in the series - Chocolate Orange Cake. I can tell you it went down an absolute storm. And I actually managed to take a photo or too before everyone tucked in...

Scrummy Chocolate Orange Cake

Ingredients

 For the cake
100g softened butter
50g cocoa powder
90ml warm water
3 large eggs
300g caster sugar
175g self raising flour
1 rounded tsp baking powder
zest of one orange
 For the icing
150g good dark chocolate
150ml double cream
some Duerr's Fine Cut Orange Marmalade

Method
Place the cocoa powder in a large bowl and mix to a paste with the hot water.
Add the eggs then the butter and mix it in.
Stir in the sugar (but don't over stir it!) before adding the flour and baking powder.
Finally add the orange zest.  If the mix seems dry add a little milk to loosen it up.

Pour into two prepared cake tins (I used the liners like the ones used in the video but you could just grease, base line and flour the edges of each tin)

Pop them into a preheated oven 170c/GAS5 for about 25 mins.

While the cake is baking break up the chocolate and put it, with the cream into a bowl placed over a pan of water. Heat the water gently to melt the chocolate into the cream. Once it's all melted remove from the heat and allow to properly cool, for about half an hour, giving it an occasional stir.

When the cakes are done, allow to cool for a few minutes then sandwich together with a big dollop of marmalade. Smooth some more marmalade over the top of the cake and then cover with the cooled chocolate ganache (posh name for cream/choc mix ;-) )

If you want you can grate more chocolate over the top to decorate.

The original recipe called for Apricot jam in the middle but I wanted a full on choc orange experience so went with marmalade all the way - it was well worth it!

To watch the boys baking this cake check out the video below...


As you can see this show stopper is dead easy to make and the smell as it was baking was heavenly!
Also, I can guarantee there won't be any left overs for later unless you stash a slice in the fridge, behind the butter... *cough*

Happy Baking!

Thursday, November 14, 2013

Make a Spotty Tshirt for Children in Need

'Mummy, have I got something spotty to wear? We can wear something spotty to school on Friday for Children in Need'
For a child whose mother is ever so slightly obsessed with polka dots, Roo has a grand total of no spotty clothes whatsoever! Not a problem, says I, you have some white tshirts we can customise. And then I completely forgot about it.

Until this evening when Roo reminded me that he needed something spotty to wear to school. Tomorrow.

Here's what I did...


How to make a Spotty Tshirt for Children in Need in less than 15 minutes because you completely forgot to do it earlier in the week....

You will need

1 tshirt
a piece of fusible webbing (Bondaweb or similar)
scraps of coloured fabric
something round to use as a template (I used one of those dosing cups that come with EVERY bottle of washing liquid I buy...)
Scissors
Iron


First draw some circles on the paper side of the fusible webbing and cut roughly around them.


Place it, sticky side down, on your fabric and iron in place.


Cut out your circles.


Position your circles onto your tshirt until you are happy with the arrangement


Peel of the backing paper and iron the fabric circles to your tshirt


Put tshirt on and wear with pride whilst helping to raise money for Children in Need!


I do apologise that this is a bit last minute but, you know, that's just how it happens sometimes...


Related Posts Plugin for WordPress, Blogger...
Blogging tips