Showing posts with label tutorial. Show all posts

Tuesday, March 31, 2015

Upcycled Jeans Patchwork Quilt (part 1)


Debenhams are celebrating the launch of a brand new jeans page on their website by challenging crafty bloggers to come up with ideas for upcycling their old jeans.


Well as I have recently lost rather a lot of weight (hurrah, finally starting to shift the mumtum!) I have a pile of old, worn out jeans just ripe for upcycling so this challenge was perfectly timed.


Wednesday, September 10, 2014

How to... Crochet a made-to-measure plant pot cosy

I picked up a lovely pot of apricot coloured chrysanthemums from my local supermarket for a bargain price of 60p the other day. I do hate to see a good plant left to die so naturally it came home with me.
All it needed was a good water and a bit of dead heading to look as good as it's full-priced sisters.

Oh, and something HAD to be done about it's somewhat dowdy pot...


Wednesday, July 02, 2014

Upcycled Coffee Tin Desk Tidy with Jane Means Ribbons

Did you notice the snazzy new 'I'm a Jane Means Blogger' badge in my side bar? I made the suggestion a few months back that the little tribe of ribbon bloggers might like a badge to show off  on their blogs and now we have one! (if you click on it, it will open up all the blog pots I have done featuring Jane's lovely ribbons)

I have used the ribbons to decorate empty gravy granule tubs before - now here is an idea for upcycling those lovely tins that the new Barista style instant coffees come in. (You could of course use gravy granule tubs for this make too!)


Wednesday, April 16, 2014

Ribbon Decorated Cushion Tutorial

So, I promised you a couple of tutorials to tie in with this month's Crafty Obsession  and here is the first - How to make a cute decorative pillow with ribbon trim.

The instructions are for a small pillow measuring approx 32cm x 24cm but it can be easily adapted to make a pillow any size you want!

Instructions include a seam allowance of 1cm - add extra to the width (the short edge) if you feel you need it!


Sunday, March 02, 2014

DIY Heart Pompom Pillow Tutorial


All the way through February I have, in the name of Crafty Obsessions, been obsessing over pompoms - oooohing and aaaaahing over pompoms of all sizes, colours and materials and adding lots of lovely projects and inspirational ideas to my Pompomtastic pinterest board.

Judging by the response to the Pastel Pompom Garland tutorial I linked up with Tuesday Tutorials last week I guess you are all pretty much obsessing over pompoms too!


Tuesday, February 11, 2014

Tuesday Tutorials week 2

Hello! Welcome to week 2 of Tuesday Tutorials Pin Party!


Our launch week was a resounding success - we had 36 fab tutorials, how to's and recipes link up by the end of the week. These have all been added to our Tuesday Tutorials Pinterest board. Why not head over, have a look and start sharing those pins?

Wednesday, February 05, 2014

Crafty Obsessions - PomPoms!!!

This month, in the name of creative blogginess I will mostly be obsessing over pompoms.  Honestly, consider it a service to craftkind...

Tuesday, February 04, 2014

Tuesday Tutorials - it's Pintastic!


Hello and welcome to the very first Tuesday Tutorials Pin Party!  If you missed my post last week explaining what this weekly linky is all about why not hop over here and check it out. If you need reminding of the very basic rules of this linky then check out the Tuesday Tutorials tab above!

So, each week Kate, Gude, Anna and myself will be hosting the linky on our blogs and spending the rest of the week busily pinning, tweeting and generally spreading the #Pintorials word.

All you have to do is link up your tutorials below!

We would love it if you could join in sharing the love too - visit the Tuesday Tutorials Pin Party board on Pinterest and start re-pinning all those fab tutorials. Over the next few weeks and months, with your help, we hope to fill this board with lots of lovely how-to's, recipes, DIY's and crafty projects.

Each week I will pick my favourites from the week before and share them here too.

So lets get this party started!

This week I am pinning one of my first tutorials - lovely ribbon and button corsages

Now it's your turn - just add one of your own tutorial/how to/DIY/recipe posts to the linky below. Don't forget to visit the Pinterest board too and maybe pop along to a few other blogs on the linky and show some love...

Tales from Mount Pleasant
Grab the button

Thursday, January 16, 2014

Simple Button Hoop Art Tutorial

I love collecting buttons - I have even been known to buy stuff from charity shops simply for the buttons!

Sometimes it seems a bit of a shame to hide them away in a tin where their multicoloured buttony gloriousness cannot be appreciated...

So here's a simple idea to show off your button collection - pick out a few of your favourites, a scrap of fabric and an embroidery hoop and whip up a little piece of art in next to no time.


You will need


Some buttons
Embroidery Hoop
piece of fabric to fit embroidery hoop
piece of felt to back (optional)
fabric glue


First cut a circle of felt, if you are using, the same size as the inner diameter of your hoop. You can glue this to the back of your work to neaten it when you are done and believe me it's MUCH easier to cut it out now!

Place your fabric into your embroidery hoop - make sure it is stretched nice and tight.

Arrange your buttons any way you like until you are pleased with the layout them simply stitch into place. (you could glue them on for a completely no-sew make but I like to see the stitching)


When you have sewn all the buttons on,  trim the fabric all the way round leaving about 4cm or so to wrap around the hoop.


Apply a thin layer of glue to the inside of the inner ring of the hoop and stick the fabric down.

Then add the backing felt with more fabric glue and leave to dry


Ta da!

What could be easier than that? I used a tiny 10cm hoop but you could use any size you like.

Group buttons by size, shape, colour or material or go completely random. Contrast, clash or match - it's entirely up to you!!


I am loving obsessing over buttons this month - my Pinterest board is filling up with gorgeous button images and crafty ideas and I have a couple more projects to share with you before the end of the month too!


Happy Crafting x

Thursday, November 14, 2013

Make a Spotty Tshirt for Children in Need

'Mummy, have I got something spotty to wear? We can wear something spotty to school on Friday for Children in Need'
For a child whose mother is ever so slightly obsessed with polka dots, Roo has a grand total of no spotty clothes whatsoever! Not a problem, says I, you have some white tshirts we can customise. And then I completely forgot about it.

Until this evening when Roo reminded me that he needed something spotty to wear to school. Tomorrow.

Here's what I did...


How to make a Spotty Tshirt for Children in Need in less than 15 minutes because you completely forgot to do it earlier in the week....

You will need

1 tshirt
a piece of fusible webbing (Bondaweb or similar)
scraps of coloured fabric
something round to use as a template (I used one of those dosing cups that come with EVERY bottle of washing liquid I buy...)
Scissors
Iron


First draw some circles on the paper side of the fusible webbing and cut roughly around them.


Place it, sticky side down, on your fabric and iron in place.


Cut out your circles.


Position your circles onto your tshirt until you are happy with the arrangement


Peel of the backing paper and iron the fabric circles to your tshirt


Put tshirt on and wear with pride whilst helping to raise money for Children in Need!


I do apologise that this is a bit last minute but, you know, that's just how it happens sometimes...


Monday, October 07, 2013

Tshirt yarn projects - crochet bowl

So this month I am mainly obsessing over tshirt yarn!

I think there is another blog post in there somewhere but today I am going to show you how to make this cute little tshirt yarn crochet bowl. These bowls make great dressing table tidies - fill em up with hair bands or cotton wool balls.  Or sweeties (it is ok to have sweeties on your dressing table, isn't it?) or, as I have done, with hazelnuts Roo collected from Nonny's garden...

The original pattern I used for this bowl on can be found here - I have just converted it into UK crochet terms.

You will need


One large tshirt made into tshirt yarn
10mm crochet hook

crochet terms - ch = chain    htr = half treble  ss = slip stitch

R1  ch3, join to make a ring. ch2 (this counts as first htr) 9htr into ring, ss to 2nd ch to join
R2  ch2, htr into same stitch, 2htr into each stitch, ss join to 2nd ch (20 stitches)
R3  ch2 *htr in next stitch, 2htr in following stitch* repeat to end, ss join to 2nd ch (30 stitches)
R4  ch2, htr into each stitch to end, ss join to 2nd ch

repeat round 4 as many times as you like until you reach the desired depth of your bowl. The bowl illustrated has 4 repeats.

And there you have it.

Use narrower strips of tshirt yarn and a smaller hook to make a smaller bowl.
Or double up the yarn and use a HUGE hook for a super chunky bowl that could serve as a toy tidy.
Make a set in toning colours or even dye plain white shirts before cutting them up to perfectly co-ordinate with your decor.


The best thing is you are turning something old into something lovely and new...and useful too! 

Like this project? Keep your eyes peeled (or better still follow this blog via bloglovin ) for more tshirt yarn projects coming soon!

Happy Crafting x


Thursday, October 03, 2013

DIY T-Shirt Yarn - joining short pieces

I have some exciting news! I have been asked to participate in a crafty workshop at this year's Forest Showcase!

Lydney Dial-a-Ride - a local charity I have close connections with - have an entire marquee at the show with the aim of educating people about what charity shops actually do! What happens to the items you donate and where the money raised from sales is spent. The manager, Louise, has asked a few of us crafty types to come along and show people that you can do so much more with your charity shop purchases than just wear them off the rail...

My demo will be on recycling old clothes and turning them into beautiful things for your home.

And where better to start than with how to make Tshirt yarn!

The concept of recycling tshirts into a yarn to make something new with has been around for a while. There are lots and lots of tutorials out there showing you how to create a continuous length of yarn from a tshirt (here's a very simple tutorial from Mollie Makes  )

But these tutorials assume that your tshirts are essentially a tube with no side seams. This method of tshirt construction is more commonly seen in men's tshirts as women's tend to be shaped to accommodate (or accentuate) our curves so unless you are lucky enough to have a fella who doesn't mind you shredding his trusty tees finding the right shirt for this method can be tricky.

I have been scouring local charity shops for this project and so far have found only one shirt with no side seams so I really needed to find a way of joining the strips together securely but not too bulky. Machine stitching them together is time consuming so why not try this method...

First you will need to cut your tshirt into panels - cut across the body, just under the armpits. Cut the hemmed piece off the bottom and cut the two side seams out. This should leave two rough squares of fabric.


 Cut these into strips across the width of the fabric. You can cut the strips as wide or as narrow as you want - it depends on the project you have in mind. Just remember that the wider the strip, the chunkier the finished yarn will be (and the less you will get from each shirt!).  I wouldn't recommend cutting any narrower than about 1/2" or 12mm...


 Take two strips and lay them end to end - don't worry too much if they are not exactly the same width... 


Cut a small slit in the ends of your fabric strips


Take one fabric strip (1) and pass it through the slit in the other fabric strip (2)  ...


...then take the other end of strip 1 and pass that through the slit you cut in it...


... and pull!

This creates a good firm join. Once you have joined all the strips you can then pull the strip as for the continuous lengths to create the yarn.

Now you have no excuse not to recycle all those old tshirts whether they have side seams or not!

the start of a t-shirt yarn crochet rug using 10mm hook

I have really enjoyed turning old tshirts into yarn and it is intensely satisfying then turning that yarn into something completely different.  I hope to show off a few finished articles very soon and am planning a couple of simple tutorials - including the crochet rug pictured above!

In the meantime - why not pop along to the Forest Showcase on Sunday 6th October at Speech House, Forest of Dean, join me on the hay bales and learn how to turn rags into rugs! 


Thursday, September 26, 2013

Craft Blog Club Challenge - Cover a notebook

A few weeks ago I spotted something new on Twitter on a Tuesday night.

#CraftBlogClub - hosted by the lovely Emma of Life is Peachy every Tuesday between 7 and 8pm - gives crafty bloggers a chance to chat about craft blogging, offer advice support and generally have a bit of a giggle. Emma tries to keep us focused on a theme each week (she also does a fantastic write up on her blog afterwards covering the main points talked about) and also sets us a monthly challenge. As there are so many different craft bloggers, each with their own niche, it's a great idea to get us all to offer up our own interpretation of a theme...

This month's challenge was to cover a notebook.


I chose to use a simple method I have used many times before but with a little twist, trying something new is what keeps things interesting right? I wasn't sure how well it would work but I am pretty pleased with the results!


You will need


Fabric - measurements depend on the size of book you wish to cover

one piece of main fabric
one piece of iron-on, medium weight interfacing (not essential but a good idea if you are using a light fabric)
one piece of contrast fabric

Ribbon for the spine trim
Ribbon for wrap around tie
matching button

Measuring up - your main fabric needs to be (4x the width of the front cover ) + the spine measurement  x the height of the book + 4cm
The contrast panel needs should be the same height as main panel and a bit less than half the width.

so for my A5 note book the main fabric measured (4 x 10.5cm) + 1cm  by (15cm + 4cm)
or 43cm x 19cm  and the contrast panel 20cm x 19cm

Cut the piece of iron on interfacing 1cm smaller all around - so in this case 41cm x 17cm - and place it centrally on the wrong side of your main fabric. Iron into place.


Press a 1cm seam along the 2 short edges and sew it in place (you'll see in the picture that I folded a hem on the long edge too - I'm not sure why, it's not necessary. I must have had a brain melt at that moment ;-) )

Fold the fabric in half length ways to find the centre point that will sit on the spine of the book.
Cut a length of wide ribbon - I used this lovely 20mm  Whitby Stripe by Jane Means - the height of the book + seam allowance (so, in this case, 19cm) and stitch it into position down the centre of your cover.


Now place your notebook, open, on the right side of the cover, making sure the spine is aligned with the ribbon. Fold each end over the notebook cover.


 Slide the notebook out of the cover and then take your contrast panel and pin it, face down, centrally so it covers the gap between each folder over end. (Again, no need to fold that little hem over like I have in the photograph - however you could fold over and hem the two shorter sides if your fabric is particularly easily frayed)


Stitch across the two long edges with a 1.5cm seam allowance. Trim the seams then turn through.


 Press the cover and slide the notebook into it's new jacket!

Adding ribbon loop and tie

Cut the ribbon approx 3 x the width of the book. I used a lovely cream and baby blue stripe ribbon from the Jane Means collection.

Seal the ends by holding it close (but not too close!) to a naked flame.The heat melts the fibres and stops the ribbon fraying.


Fold over one end to form a loop and stitch a button in place, sewing through the two layers of ribbon


Take a few stitches through the top layer of the book cover to secure (you might want to leave the book in the cover while you do this so you don't end up stitching right through the cover. Like I did...

Wrap the ribbon around the book and tuck the loose end through the loop.


Add a pen and pop it into your bag for stylish note taking on the go :-)


Happy Crafting!

Saturday, August 31, 2013

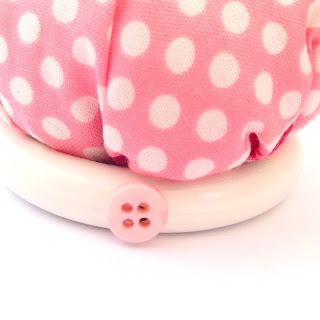
Something for the Weekend - cute mini pincushion tutorial


Here's a cute project for you - these adorable little pincushions take just moments to put together and make fab gifts for your stitchy friends!


For the base I used a small curtain ring  - I picked up a big bag of them for £1.50 from a charity shop last year - even bought new they are much cheaper than the purpose made 'craft rings' you can buy and wooden ones can easily be painted to match your chosen fabric too!


You will need:


small wooden curtain ring (outer diameter 55mm)
circle of fabric approx 15cm diameter - I used a small plate as a template
circle of felt cut to inner diameter of curtain ring
needle and thread
toy stuffing
craft glue
teeny button to trim


 First run a gathering stitch around the edge of your fabric circle, approx 5mm in from the edge.


Pull the the thread to gather the fabric together 


Add the stuffing then pull the thread tight to close the gap and fasten off. 
Don't worry too much about neatness as this will be hidden later... 


 Put some glue all around the edge of the curtain ring


Place the cushion on top. 
Push down gently so the fabric comes into contact with the glue all the way around.  
Leave to dry for a few minutes.


Now glue the felt circle onto the bottom of the cushion to neaten it up.

My curtain ring had a small hole where I had removed the eye hook so I covered it up by gluing on a teeny pink button.


And there you have it - pincushion cuteness in minutes! 

Team up with a matching needle book for a perfectly co-ordinated addition to your work basket.

(if you really don't want to make one yourself, this little pincushion, along with cute matching needle book, is available to purchase from my Folksy shop now! )


Happy Crafting!


Related Posts Plugin for WordPress, Blogger...
Blogging tips