Wow - I cannot believe it's been 6 weeks since I last blogged!
Things have been pretty busy around here so here's a little update on everything we've been up to in October...

Showing posts with label house and home. Show all posts
Showing posts with label house and home. Show all posts
Wednesday, November 04, 2015
Wednesday, September 10, 2014
How to... Crochet a made-to-measure plant pot cosy
 I picked up a lovely pot of apricot coloured chrysanthemums from my local supermarket for a bargain price of 60p the other day. I do hate to see a good plant left to die so naturally it came home with me.
All it needed was a good water and a bit of dead heading to look as good as it's full-priced sisters.
Oh, and something HAD to be done about it's somewhat dowdy pot...
Wednesday, April 16, 2014
Ribbon Decorated Cushion Tutorial

The instructions are for a small pillow measuring approx 32cm x 24cm but it can be easily adapted to make a pillow any size you want!
Instructions include a seam allowance of 1cm - add extra to the width (the short edge) if you feel you need it!
Monday, March 24, 2014
Busy Times...
You may have noticed I've not been around here much the last couple of weeks.
March always seems to be a busy month for us. There is the all the paperwork for the year to sort out for my Other Half's motorcycle shop - getting everything together ready for the accountants; chasing up missing invoices; sorting through all the ins and outs; and then there's stock take... *shudders*
March always seems to be a busy month for us. There is the all the paperwork for the year to sort out for my Other Half's motorcycle shop - getting everything together ready for the accountants; chasing up missing invoices; sorting through all the ins and outs; and then there's stock take... *shudders*
Tuesday, March 11, 2014
CraftblogClub IReLoveYou Challenge
Emma at Frugally Peachy set us a brilliant CraftBlogClub challenge in February - to thriftyly upcycle an item of homeware and make it beautiful again. She said we could use something we already had or purchase something second hand to reinvent.
It was the perfect excuse to get on with a little project I have had in the pipeline since last summer when I first saw an amazing book in our local library...
It was the perfect excuse to get on with a little project I have had in the pipeline since last summer when I first saw an amazing book in our local library...
Saturday, May 25, 2013
#CreativeBudget - Pretty Reversible Tea Towel Tutorial
Sometimes, when money is tight, you just have to make do with what you have - even if it is falling apart/unpractical/you just hate it.
My kitchen is a prime example.
The oven died the week before Christmas a couple of years ago. We had no money so we had to settle for the cheapest one we could get delivered and fitted as quickly as possible. What we had hoped to do was wait until the January sales to replace the dying cooker but fate clearly decided that was not going to be an option. The oven we ended up with truly was cheap and nasty - it works but the temperature gauge is iffy and the dial seems to turn by itself and heat the oven way too high resulting in stuff burning if you turn your back for five minutes. Unfortunately the company who supplied and fitted it (badly) have since gone bust and disappeared. We can't afford another so I'm stuck with it.
My sink is the same - a horrid white 'textured' plastic thing - textured means it traps every speck of dirt that comes close to it and white means the dirt shows - no matter how hard I scrub it with bleach! But it's a non standard size so not just a simple case of ripping it out and sticking a nice shiny stainless steel one in.We would need new worktop too...
But we have no spare money so we have to make do.
(I did manage to get some new cupboard doors for free a while back - they're not perfect but they were a lot better than the drab grey we had before! You can read about that here )
Thankfully there are ways you can change things up a little without spending too much cash!
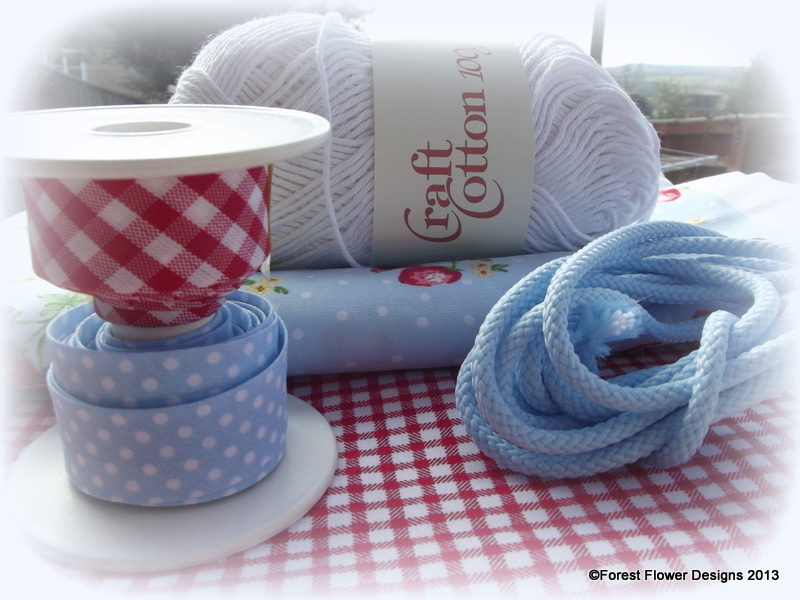
My Abakhan creative budget project this month has been all about cheering up my kitchen and I had this little bundle of sweetness to do it with...

1 metre red cotton Gingham
1 metre sky blue strawberry print cotton (currently out of stock)
red gingham bias binding
blue polka dot bias binding
sky blue cord
100g ball white craft cotton

 Nothing says cosy country kitchen better than red gingham don't you think? And the beautiful sky blue cotton with strawberries and polka dots (always a winner in my book) is just perfect for kitchen accessories. Bright red and sky blue is one of my favourite colour combinations too!
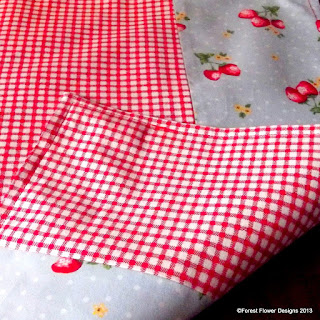
The first thing I made with my fabric was this really simple reversible tea towel.
 You need four pieces of fabric - One 45cm x 45cm and one 15cm x 45cm in main fabric plus one 45cm x 45cm and one 15cm x 45cm in a contrast fabric.
Pin the small contrast fabric rectangle to the main fabric square along one 45cm edge and sew together using a 5mm seam allowance.
Do the same with the contrast fabric square and the small rectangle of main fabric.
Press the seams open.
You should now have 2 rectangles of fabric measuring approx 60cm x 45 cm

Pin your two rectangles right sides together, making sure you line up the seams where you have joined the panels as best as you can, and stitch all the way around, again using a 5mm seam allowance.
Leave a 10cm gap on one edge so you can turn your work the right way round. Trim the corners, turn and press.
Sew a row of top stitching (that's just a normal straight stitch that is visible rather than being a seam) in a contrast thread - I used red - as close to the edge of the tea towel as possible - this holds the fabric in place and closes up the gap you left to turn.
And that is it. Simples.

I love it! (I may have to force myself to actually use it though - it's so pretty!)
I think a bundle of these in co-ordinating fabrics would make a wonderful new home gift. Add a matching pot holder, oven gloves, an apron and pretty knitted dishcloth (tutorials for all of these will follow in the next couple of weeks) for a pretty and practical gift that can easily be customised to suit the tastes and decor of the recipient.And all for under £20.

P.S. Polka dots and gingham not your thing? Abakhan have a great selection of 100% cotton fabrics that would work well for this project. I am particularly loving this bird print which would look lovely with the checks or stripes.
My kitchen is a prime example.
The oven died the week before Christmas a couple of years ago. We had no money so we had to settle for the cheapest one we could get delivered and fitted as quickly as possible. What we had hoped to do was wait until the January sales to replace the dying cooker but fate clearly decided that was not going to be an option. The oven we ended up with truly was cheap and nasty - it works but the temperature gauge is iffy and the dial seems to turn by itself and heat the oven way too high resulting in stuff burning if you turn your back for five minutes. Unfortunately the company who supplied and fitted it (badly) have since gone bust and disappeared. We can't afford another so I'm stuck with it.
My sink is the same - a horrid white 'textured' plastic thing - textured means it traps every speck of dirt that comes close to it and white means the dirt shows - no matter how hard I scrub it with bleach! But it's a non standard size so not just a simple case of ripping it out and sticking a nice shiny stainless steel one in.We would need new worktop too...
But we have no spare money so we have to make do.
(I did manage to get some new cupboard doors for free a while back - they're not perfect but they were a lot better than the drab grey we had before! You can read about that here )
Thankfully there are ways you can change things up a little without spending too much cash!
My Abakhan creative budget project this month has been all about cheering up my kitchen and I had this little bundle of sweetness to do it with...
1 metre red cotton Gingham
1 metre sky blue strawberry print cotton (currently out of stock)
red gingham bias binding
blue polka dot bias binding
sky blue cord
100g ball white craft cotton

 Nothing says cosy country kitchen better than red gingham don't you think? And the beautiful sky blue cotton with strawberries and polka dots (always a winner in my book) is just perfect for kitchen accessories. Bright red and sky blue is one of my favourite colour combinations too!
 The first thing I made with my fabric was this really simple reversible tea towel.
Simple Reversible Tea Towel Tutorial
 You need four pieces of fabric - One 45cm x 45cm and one 15cm x 45cm in main fabric plus one 45cm x 45cm and one 15cm x 45cm in a contrast fabric.
Pin the small contrast fabric rectangle to the main fabric square along one 45cm edge and sew together using a 5mm seam allowance.
Do the same with the contrast fabric square and the small rectangle of main fabric.
Press the seams open.
You should now have 2 rectangles of fabric measuring approx 60cm x 45 cm

Pin your two rectangles right sides together, making sure you line up the seams where you have joined the panels as best as you can, and stitch all the way around, again using a 5mm seam allowance.
Leave a 10cm gap on one edge so you can turn your work the right way round. Trim the corners, turn and press.
Sew a row of top stitching (that's just a normal straight stitch that is visible rather than being a seam) in a contrast thread - I used red - as close to the edge of the tea towel as possible - this holds the fabric in place and closes up the gap you left to turn.
And that is it. Simples.


I love it! (I may have to force myself to actually use it though - it's so pretty!)
I think a bundle of these in co-ordinating fabrics would make a wonderful new home gift. Add a matching pot holder, oven gloves, an apron and pretty knitted dishcloth (tutorials for all of these will follow in the next couple of weeks) for a pretty and practical gift that can easily be customised to suit the tastes and decor of the recipient.And all for under £20.

P.S. Polka dots and gingham not your thing? Abakhan have a great selection of 100% cotton fabrics that would work well for this project. I am particularly loving this bird print which would look lovely with the checks or stripes.
As always I had a £15 budget to spend at Abakhan who supplied this bundle of goodies free of charge. No other payment has been received.
Wednesday, January 30, 2013
#CreativeBudget - DIY cosy rug


As ever I had a budget of £15 to spend - here is what I got*

1m Organic Cotton Hopsack drill in 'natural'
1m 'Lambskin' fur fabric in ecru
5m Beresfords double face satin ribbon 50mm in khaki
*now admittedly I ordered these items during the sale and they came in at £14.74 - at current website prices this little bundle will cost you £18.20 - still a bit of a bargain, I think you'll agree!
and this is what I did with it...
DIY Mitred Corner rug with ribbon trim.
Take your metre of cotton drill, fold it half width ways and cut into two pieces measuring approx 1m x 75cm. Put one piece aside - this will be the backing for your rug.

Cut the other piece into 4 strips - two measuring 100cm x 15cm and two measuring 75cm x 15cm. These will form the 'frame' of your rug.
 Cut 4 lengths of ribbon - two 100cm long and two 75cm long. Position these centrally along the 'frame' pieces.
I did this by folding a 5cm 'hem' along the long edge of my drill fabric and ironing the crease in. You can then align one edge of the ribbon to this crease and it will be perfectly central all the way along!

Pin the ribbon in place before machine stitching using a small zig zag stitch. Satin ribbon can be quite slippy so don't rush it and take care that it doesn't slide out of position.

To create the mitred corners take one longer and one shorter piece and pin them together at one end, right sides facing, ensuring that the ribbon trim on both pieces is aligned. Measure in 15cm from bottom corner and draw a diagonal line from this point up to the top corner. Machine stitch along this line.

Trim off the excess fabric and press the seam open (make sure you place a tea towel or an off cut of fabric over the ribbon ends when you iron as the hot iron will melt the ribbon!)


Repeat with the other long and short piece and join the two pieces together to finish off your frame


Now you need to measure the long and short inside edge of your frame. Add 5cm to these measurements (to allow for the frame not being totally 'square' ) and cut out your centre panel in the lambswool fleece fabric. Place the frame and the fleece face down on your table and, starting from the centre of one short side begin pinning the two pieces, right sides together.


When you are happy that your central panel is positioned correctly trim away the excess fleece fabric and machine stitch it in place - I found it easier to treat each side as a separate seam rather than try and go all the way round in one go as the corners were quite bulky.
Finally take the other piece of the hopsack drill fabric. Pin it to your mat, right sides together and, leaving a gap for turning, stitch all the way around. Trim the seams, press them open and turn. Slip stitch the opening together. Give your mat an iron (on the back - your ribbon and fleece will both melt if they come into contact with a hot iron!!!) , lay it on the floor and stand back to admire your handiwork!

I am really pleased with the result! Yes it's a little wonky but that gives it character. Now I have mastered the 'mitred corner' I will definitely be making more of these floor mats for other rooms as it lends itself to being altered in a number of ways. I used the thick hopsack twill fabric because I wanted a sturdy rug that would stand up to a bit of use (and abuse) but you could use any pretty fabric if your mat is going into a low traffic area like your bedside (imagine sinking your feet into that cosy fleece every morning!). You could use fabric strips instead of ribbon for the trim or use towel for the centre panel and you have a bathmat.
You'll have noticed that our new kitten (more about him in another post) has taken rather a shine to the fleece centre and as I used only a tiny bit of the metre of fabric I ordered I have an idea of how to make use of the rest. Stay tuned - I will blog that project at a later date...
ps - apologies for the bad photographs. This project was done during the Snow Week and the natural light I usually take advantage of via our conservatory was all blocked out by about 10" of snow on the roof!
pps - if you would like to see more fab Creative Budget projects, Abakhan have just set up a board on Pinterest showcasing them all! You can follow it here
Monday, January 14, 2013
Ecover Zero Review - New Fragrance Free range
Late last year I received a lovely pack of goodies from Ecover - a selection from their new 'Zero' range.
I have been a fan of Ecover products for a long time, particularly their washing up liquid which I find to be just as good as that well known brand but without the chemical nasties, so I was excited to give the new 'Zero' range a try. All the products in this range are dermatologically tested, suitable for those with sensitive skin, approved by Allergy UK and completely fragrance free.
Zero Washing Powder claims to be "tough on stains, even at 30℃" , dermatologically tested and suitable for sensitive skins. I found it to be perfectly acceptable for my regular washing although I would say that "tough" stains would need a little extra help - if you are bothered by visible marks - and I'm not sure how it would have coped with the piles of dirty nappies I used to wash on a daily basis!
Zero Fabric Softener left my clothes beautifully soft and smelling like they'd been line dried - fresh and clean without that over powering perfume that most softeners add to the wash. Like the powder it is suitable for those with sensitive skin and I would definitely recommend it for a baby clothes wash!
Zero Washing Up Liquid was just as effective as my favourite Ecover Marigold and Chamomile washing up liquid. As with all their washing up liquids it doesn't produce quite as much foam as other brands - but trust me, that is a good thing! It left my dishes lovely and clean and, as a washer-upper who can't stand wearing rubber gloves, I was please to note it left my hands in great condition too! I will probably stick to my fragranced favourite but I would certainly recommend it to anyone with extra sensitive skin.
Unfortunately Ecover Zero products aren't yet available in supermarkets but some independent health food stores (like my local, Wyedean Wholefoods) now have them in stock. Alternatively you can shop the range online through EcoverDirect
 | |||
Ecover Zero washing powder, fabric softener and washing up liquid and a lovely waffle tea towel too! You spoil me!
I have been a fan of Ecover products for a long time, particularly their washing up liquid which I find to be just as good as that well known brand but without the chemical nasties, so I was excited to give the new 'Zero' range a try. All the products in this range are dermatologically tested, suitable for those with sensitive skin, approved by Allergy UK and completely fragrance free.
Zero Washing Powder claims to be "tough on stains, even at 30℃" , dermatologically tested and suitable for sensitive skins. I found it to be perfectly acceptable for my regular washing although I would say that "tough" stains would need a little extra help - if you are bothered by visible marks - and I'm not sure how it would have coped with the piles of dirty nappies I used to wash on a daily basis!
Zero Fabric Softener left my clothes beautifully soft and smelling like they'd been line dried - fresh and clean without that over powering perfume that most softeners add to the wash. Like the powder it is suitable for those with sensitive skin and I would definitely recommend it for a baby clothes wash!
Zero Washing Up Liquid was just as effective as my favourite Ecover Marigold and Chamomile washing up liquid. As with all their washing up liquids it doesn't produce quite as much foam as other brands - but trust me, that is a good thing! It left my dishes lovely and clean and, as a washer-upper who can't stand wearing rubber gloves, I was please to note it left my hands in great condition too! I will probably stick to my fragranced favourite but I would certainly recommend it to anyone with extra sensitive skin.
Unfortunately Ecover Zero products aren't yet available in supermarkets but some independent health food stores (like my local, Wyedean Wholefoods) now have them in stock. Alternatively you can shop the range online through EcoverDirect
Sunday, June 24, 2012
Getting organised...
It's nearly the end of June already. How did that happen? Summer Solstice (the longest day of the year) has been and gone. Before we know it the Autumnal nip will be in the air and we'll all be digging out our hats and scarves again...
What do you mean you haven't put them away from last winter yet?
To be honest, neither have I, and that is the main prompt behind this post. Not hats and scarves particularly but just putting things away generally.
Last year I was determined to become more organised. And I did. A bit. But really not enough...
Subscribe to:
Posts (Atom)