Showing posts with label fabric. Show all posts

Thursday, September 26, 2013

Craft Blog Club Challenge - Cover a notebook

A few weeks ago I spotted something new on Twitter on a Tuesday night.

#CraftBlogClub - hosted by the lovely Emma of Life is Peachy every Tuesday between 7 and 8pm - gives crafty bloggers a chance to chat about craft blogging, offer advice support and generally have a bit of a giggle. Emma tries to keep us focused on a theme each week (she also does a fantastic write up on her blog afterwards covering the main points talked about) and also sets us a monthly challenge. As there are so many different craft bloggers, each with their own niche, it's a great idea to get us all to offer up our own interpretation of a theme...

This month's challenge was to cover a notebook.


I chose to use a simple method I have used many times before but with a little twist, trying something new is what keeps things interesting right? I wasn't sure how well it would work but I am pretty pleased with the results!


You will need


Fabric - measurements depend on the size of book you wish to cover

one piece of main fabric
one piece of iron-on, medium weight interfacing (not essential but a good idea if you are using a light fabric)
one piece of contrast fabric

Ribbon for the spine trim
Ribbon for wrap around tie
matching button

Measuring up - your main fabric needs to be (4x the width of the front cover ) + the spine measurement  x the height of the book + 4cm
The contrast panel needs should be the same height as main panel and a bit less than half the width.

so for my A5 note book the main fabric measured (4 x 10.5cm) + 1cm  by (15cm + 4cm)
or 43cm x 19cm  and the contrast panel 20cm x 19cm

Cut the piece of iron on interfacing 1cm smaller all around - so in this case 41cm x 17cm - and place it centrally on the wrong side of your main fabric. Iron into place.


Press a 1cm seam along the 2 short edges and sew it in place (you'll see in the picture that I folded a hem on the long edge too - I'm not sure why, it's not necessary. I must have had a brain melt at that moment ;-) )

Fold the fabric in half length ways to find the centre point that will sit on the spine of the book.
Cut a length of wide ribbon - I used this lovely 20mm  Whitby Stripe by Jane Means - the height of the book + seam allowance (so, in this case, 19cm) and stitch it into position down the centre of your cover.


Now place your notebook, open, on the right side of the cover, making sure the spine is aligned with the ribbon. Fold each end over the notebook cover.


 Slide the notebook out of the cover and then take your contrast panel and pin it, face down, centrally so it covers the gap between each folder over end. (Again, no need to fold that little hem over like I have in the photograph - however you could fold over and hem the two shorter sides if your fabric is particularly easily frayed)


Stitch across the two long edges with a 1.5cm seam allowance. Trim the seams then turn through.


 Press the cover and slide the notebook into it's new jacket!

Adding ribbon loop and tie

Cut the ribbon approx 3 x the width of the book. I used a lovely cream and baby blue stripe ribbon from the Jane Means collection.

Seal the ends by holding it close (but not too close!) to a naked flame.The heat melts the fibres and stops the ribbon fraying.


Fold over one end to form a loop and stitch a button in place, sewing through the two layers of ribbon


Take a few stitches through the top layer of the book cover to secure (you might want to leave the book in the cover while you do this so you don't end up stitching right through the cover. Like I did...

Wrap the ribbon around the book and tuck the loose end through the loop.


Add a pen and pop it into your bag for stylish note taking on the go :-)


Happy Crafting!

Wednesday, June 05, 2013

New stock - Lavender stuffed hearts and birds

I have a craft fair in less than 2 weeks. It's the first one I've done this year and I am sharing a table with a friend who has just started her own craft business. She makes the most adorable baby dresses - mostly inspired by her adorable baby girl ;-)

I still have some stock left over from Christmas - mostly of the red and white felt birds and hearts like these - but I decided that this fair is an opportunity to try out a few new items.

After the success of my reversible tea towel I bit the bullet and bought a couple of metres of pure Irish linen to make some more pretty tea towels (or dish cloths if you are American!) - I am planning on doing applique motifs, ribbon and ric rac trim, maybe a little embroidery too.  Who says drying the dishes has to be boring? I can't wait to get going on those and show you the results!

In the meantime I have been making a few of my best selling lavender stuffed hearts and birds using some of the bright, pretty and just plain quirky fabrics in my stash...


Completely hand stitched using some lovely vintage Sylko mercerised cotton with fab names like 'green plume' and 'wedgewood blue'.

Did you spot the gorgeous vintage thimble I found in Nan's old sewing box?


I can't believe how much quicker I could sew whilst wearing it! The stitches were much neater and more even too as I got a good rhythm going and I didn't have to stop every few seconds because I'd pricked my finger again!


Adding the dried lavender - using a paper funnel is much easier and less messy than trying to just drop it in! I lightly stuff with super soft carded polyester stuffing first then add a generous scoop of home grown and dried lavender flowers.


I dry lavender from my mother in law's garden by tying it up in bunches then hanging it in a paper carrier bag away from damp and drafts for a few months. The bag catches any loose bits that fall off so it doesn't make a mess! Once properly dried out I strip the flowers from the stalks and store in a large glass jar.  Just coz it looks pretty, especially with a lovely piece of ribbon from Jane Means tied around the neck! :-)

This year I hope to start my own lavender border - it will be a few years before it is established enough to harvest from though!


Once the lavender is in I add a bit more stuffing then stitch up the gap.


Once they are all stuffed and sewn up I will embellish them and add little metal hoops to hang them by.

But that's a job for another day.

I do so love my work!

Saturday, May 25, 2013

#CreativeBudget - Pretty Reversible Tea Towel Tutorial

Sometimes, when money is tight, you just have to make do with what you have - even if it is falling apart/unpractical/you just hate it.

My kitchen is a prime example.

 The oven died the week before Christmas a couple of years ago. We had no money so we had to settle for the cheapest one we could get delivered and fitted as quickly as possible. What we had hoped to do was wait until the January sales to replace the dying cooker but fate clearly decided that was not going to be an option. The oven we ended up with truly was cheap and nasty - it works but the temperature gauge is iffy and the dial seems to turn by itself and heat the oven way too high resulting in stuff burning if you turn your back for five minutes. Unfortunately the company who supplied and fitted it (badly) have since gone bust and disappeared. We can't afford another so I'm stuck with it.

My sink is the same - a horrid white 'textured' plastic thing  - textured means it traps every speck of dirt that comes close to it and white means the dirt shows - no matter how hard I scrub it with bleach!  But it's a non standard size so not just a simple case of ripping it out and sticking a nice shiny stainless steel one in.We would need new worktop too...

 But we have no spare money so we have to make do.

 (I did manage to get some new cupboard doors for free a while back - they're not perfect but they were a lot better than the drab grey we had before! You can read about that here )

Thankfully there are ways you can change things up a little without spending too much cash!

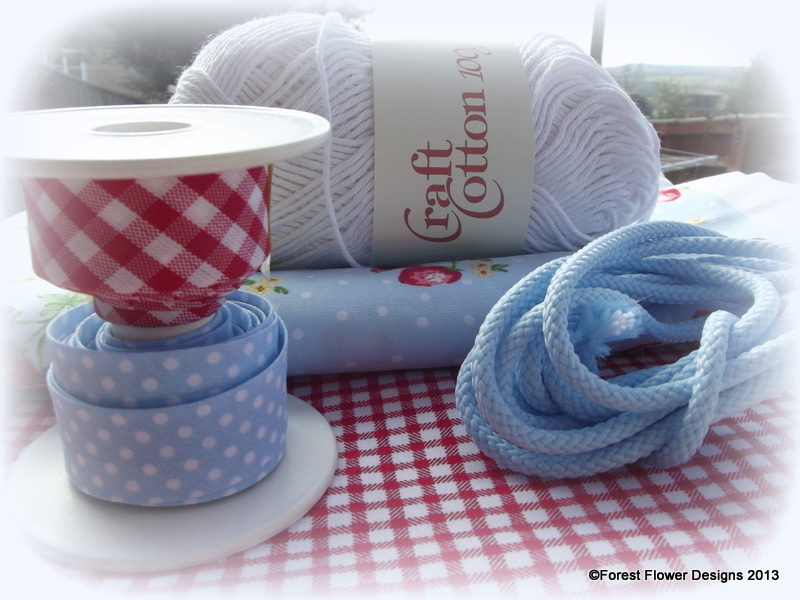
My Abakhan creative budget project this month has been all about cheering up my kitchen and I had this little bundle of sweetness to do it with...


1 metre red cotton Gingham
1 metre sky blue strawberry print cotton (currently out of stock)
red gingham bias binding
blue polka dot bias binding
sky blue cord
100g ball white craft cotton


Nothing says cosy country kitchen better than red gingham don't you think? And the beautiful sky blue cotton  with strawberries and polka dots (always a winner in my book) is just perfect for kitchen accessories. Bright red and sky blue is one of my favourite colour combinations too!


The first thing I made with my fabric was this really simple reversible tea towel.

Simple Reversible Tea Towel Tutorial


You need four pieces of fabric - One 45cm x 45cm and one 15cm x 45cm in main fabric plus one 45cm x 45cm and one 15cm x 45cm in a contrast fabric.

Pin the small contrast fabric rectangle to the main fabric square along one 45cm edge and sew together using a 5mm seam allowance.
Do the same with the contrast fabric square and the small rectangle of main fabric.
Press the seams open.

You should now have 2 rectangles of fabric measuring approx 60cm x 45 cm


Pin your two rectangles right sides together, making sure you line up the seams where you have joined the panels as best as you can, and stitch all the way around, again using a 5mm seam allowance.

Leave a 10cm gap on one edge so you can turn your work the right way round. Trim the corners, turn and press.


Sew a row of top stitching (that's just a normal straight stitch that is visible rather than being a seam) in a contrast thread - I used red - as close to the edge of the tea towel as possible - this holds the fabric in place and closes up the gap you left to turn.

And that is it. Simples.


I love it! (I may have to force myself to actually use it though - it's so pretty!)

I think a bundle of these in co-ordinating fabrics would make a wonderful new home gift.  Add a matching pot holder, oven gloves, an apron and pretty knitted dishcloth (tutorials for all of these will follow in the next couple of weeks) for a pretty and practical gift that can easily be customised to suit the tastes and decor of the recipient.And all for under £20.


P.S.  Polka dots and gingham not your thing? Abakhan have a great selection of 100% cotton fabrics that would work well for this project. I am particularly loving this bird print which would look lovely with the checks or stripes.


As always I had a £15 budget to spend at Abakhan who supplied this bundle of goodies free of charge. No other payment has been received.

Monday, March 04, 2013

The Creative Crafts Show 2013

Last week was our annual visit to the Three Counties Showground at Malvern for the Creative Crafts and Stitch Show. It's become a regular outing for us girls and this year we were joined by my Other Half's brother's girlfriend, Rosie, too. I've written about how much we love these shows before so today I will let the pictures do most of the talking :-)


A beautiful quilted 'Welcome' wall hanging by Sew Enchanting. We all loved this and the fab padded Christmas Trees that were on display to!


So much fabric, so little time... choosing fat quarters at the Stitch Witch's stall. We always spend way too much here. I got some adorable teeny weeny buttons to add to my stash!


Beautiful hand spun yarns ready to knit into something gorgeous. 


Strings of brightly coloured glass pearls - I think this year was the first year I didn't buy any beads at all. Not for want of choice. I had my eyes open for something else...


Giant Knitting!


Amazing installation by the Guild of Machine Knitters
 'Well Knit by Moonlight' designed by Alice Wolfe


Cake and crafts, of course, go hand in hand. I bought the biggest apple filled, icing covered danish pastry you have ever seen (yes, I DID share when I got home!)


A little demo on needle felting from Margaret Fox (Floral Art Products, Malvern) This is something I have been wanting to have a go at for a long time and Margaret was happy to show us the basics! I am now armed with needles, mat and wool roving and ready to go!!


Margaret's lovely display of thick wool felt all ready to be turned into something even more gorgeous - if that is possible.

I am so excited to finally have the needle felting kit and can't wait to get going. Rosie bought herself a kit too and we talked about attending one of Margaret's workshops in the near future. I will let you know how it goes.

I love visiting these specialist shows - they are jam packed with all sorts of goodies but it is especially inspiring to see experts in action and have a go yourself. It's so easy to get into a crafting rut doing the same old thing. Creativity should be stretched or it becomes stale. 

I'm off now to stab some wool!

Saturday, August 11, 2012

#CreativeBudget - Fabric Painting Fun!

It's that Creative Budget time again (if you don't know what I'm talking about here is my first Creative Budget post with a little more about the idea behind it!)

You may have noticed that I missed a July post - this was mainly due to a lot of other commitments and the Little Man finishing nursery and suddenly being at home all the time! This month I thought long and hard about creating a project that could be enjoyed by kids of all ages. I wanted to make something that the Little Man could take an active role in creating AND that he would be able to play with long after the craft tools had been packed away...

There are so many different products to chose from on the Abakhan website but I finally made my selections and spent this month's budget on 1m of bleached calico fabric, a Dylon Colourfun fabric marker pen in black and half a dozen tubes of Leeho fabric paints in bright colours.

And this is what we did with them...

Rocket play cushion


First of all wash your calico - this ensures there are no residues let from the manufacturing process that may stop the fabric paint from taking properly. Once it was dry we cut the fabric into quarters and laid one out flat. Using the Dylon marker, I drew a basic picture of a rocket. This fabulously retro rocket was copied out of Little Man's favourite colouring book :-)  Make sure you leave enough room to cut out around the outline of the picture with a couple of centimetres to spare.

Set the outline by ironing over it with a hot iron.


Now lets get painting! You can use the Leeho fabric paints straight from the tube and create patterns/doodles/writing using the fine nozzle tip (takes a bit of practise and better for older kids to do) or you can squeeze a blob of paint out and spread it around with a paintbrush for more coverage. Little Man happily got stuck in and even managed to stay within the outline most of the time!  The paints are water based so wash out of the brush and off hands easily (they are permanent once dry so wear old clothes or an apron whilst painting!)


Once you have finished colouring your picture you have to leave it to dry flat overnight.


 Once the paint is completely dry pin another quarter over the top. You should be able to see your painted picture through the fabric enough to be able to trace an outline. Use a sharp pencil to lightly sketch the outline allowing approximately 2cm around the edge of the picture. Don't worry about following the picture outline exactly, a general outline will be easier to sew!


Then you need to stitch around the outline - by hand or machine - leaving a gap to turn and stuff in a suitable place in the seam. Then trim all the excess fabric away about 5mm from the stitches, snipping into curves and notching corners to reduce fabric bulk.

Leave a little extra seam allowance where you have left the opening to make it easier to stitch up the seam when you have finished stuffing.


Turn your cushion the right way round and press it lightly with a warm iron on the back, easing it into shape.

Now we can stuff it. Fill in the extremities first using small amounts of stuffing at a time. I use a chopstick to help push the stuffing into little spaces. The Little Man joined in on this bit too adding lots of stuffing in the middle.

Make sure you stuff your pillow fairly firmly so it keeps it's shape - for a pillow this size you will need about 200g of toy stuffing.

When you have finished stuffing, stitch up the opening.


The Rocket Pillow is now ready for lift off!!!!


I finished off our pillow with a label, written with the Dylon marker pen and blanket stitched in place on the back of the pillow - just a little reminder that we made this together.  I hope it's something he will keep and cherish for years to come!


OK - I cheated a little teeny bit with this month's Creative Budget - the fabric and paints came in at a few pence more than my £15 budget and I used toy stuffing I already had, BUT we still have half a metre of calico and plenty of fabric paint left for another project or two.  Maybe an alien pillow to go with our rocket? ;-)

Calico can be used for all sorts of projects - how about a personalised P.E bag to take back to school? Or make a simple tote bag and get the kids to decorate it for you. It's guaranteed to bring a smile to everyones face when you fill it with shopping at the supermarket checkout.


Wednesday, February 02, 2011

Competiton wins!

Do you ever enter competitions on blogs or posted on Twitter or Facebook and then forget all about them? I know I do! Most of them require no more than a click to follow and a retweet or a comment left and then, as I never win anything, most of them get forgotten about!

One I had completely forgotten about was run by Yorkshire Lavender (you can follow them on Twitter @yorkslavender ) to win a kilo of their fabulous dried lavender. So as you can imagine I was thrilled when the congratulations tweet popped up in my mentions column on Tuesday :) My box of lavender arrived on Friday morning. Do you have any idea what a kilo of dried lavender looks like?

...yes that is a carrier bag full!!!
...and it smells divine :)

I use dried lavender a lot in my designs, usually homegrown and dried so I have limited stocks, so this prize was much appreciated!
We will be holidaying in Yorkshire later this year and we may even fit in a trip to the award winning Yorkshire Lavender farm and gardens and buy a few plants to add to my own garden.

As if that win wasn't enough on Saturday night I was notified that I had won another!  This one run by one of my favourite online fabric suppliers SeamStar . Their competitions are always popular and as this as a bumper giveaway open for a month I knew they would have A LOT of entries and my chance of winning would be minimal. But it didn't stop me hoping...
When Courtney at Seamstar tweeted that I had won one of the three amazing hampers I was over the moon!!!
It arrived yesterday. I hope you don't mind if I share...
Beautifully packaged!
It was my birthday last week - this was like an extra special birthday present :)
I mean - just look at all these lovelies. Who could not be inspired by this selection?

There are even a couple of lovely owl prints by one of my favourite designers Saffron Craig. This one might become the netbook sleeve I have been meaning to make...

Riley picked out this funky bright print 'Lollipop Dreams' by Patty Young as his favourite.

...and just look at this selection of gorgeous cotton voiles by Anna Maria Horner I really don't know what I am going to make with them yet, but whatever it is, it will be special!

There was also a big bag of grosgrain ribbons in just about every colour you could ever need!
Not to mention some habdash extras - pins, buttons and zips.

As competition prizes go this was pretty darn amazing so thank you once again Courtney and SeamStar for making my birthday week one to remember :) I can heartily recommend that you visit the wonderful 'Seamzine' blog for all the latest products, projects, competitions and giveaways.

And good luck...next time it could be you!


Related Posts Plugin for WordPress, Blogger...
Blogging tips