Showing posts with label Creative Budget. Show all posts

Saturday, July 20, 2013

Knitted Dishcloth Tutorial

Here is the last part of my Creative Budget 'Kitchen makeover' series.  You'll need your knitting needles for this one!!

Don't panic though these two cute dishcloths really are very simple to make - if you can knit and purl you can rustle them up in a couple of evenings whilst watching the tv. If you want to learn how to knit so you can have a go there are many online tutorials. Here's a great one from Debbie Stoller, author of the 'Stitch 'n Bitch' book series. (It doesn't include purl stitches but there are many others that are easy to follow once you have the basic technique!)


Hand knitted or crochet dishcloths last so much longer than shop bought ones and look so much nicer drying over your dish drainer. Wash them regularly in with your tea towels to keep them clean (don't expect them to stay pristine and white for long though!). I have used craft cotton but any DK cotton would do. Or any DK yarn at all really. Use up what you have around the place and don't feel that you have to stick with white!

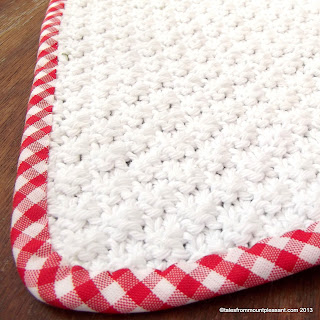
I made both cloths with one ball of craft cotton from Abakhan and there is probably enough left over for another cloth too (I may make another cloth with some of the pale blue polka dot binding I have left over from the pretty pot holder make) The simple basket weave effect pattern makes gives this cloth a good texture - excellent for getting those stubborn bits of food off your plates when washing up. The bias binding neatens up the edges nicely and adds a lovely finishing touch but it it completely optional - your cloth will work just fine without it!

Textured dishcloth with colourful binding

Using 4mm needles and craft cotton or another dk cotton yarn of your choice cast on 44 stitches

Row 1 : k2, p2 to the end
Row 2 : p2, k2 to the end
Row 3 : p2, k2 to the end
Row 4 : k2, p2 to the end

Repeat those four rows until your work measures approx 20cm (around 60 rows)

Cast off.

Sew in the ends.

Binding the cloth is easy using the same method as for my Pretty Pot Holder - start from one corner if you want to add a hanging loop like the pot holder or at the centre of one side for a neat finish with no loop. Stitch the binding by hand or machine if you prefer. When you get back to the start, tuck the end under and secure the overlap with a few extra stitches.


Heart Pattern Dishcloth

This cute heart patterned cloth is almost too pretty to do the dishes with! If you really can't bring yourself to use it in the kitchen it would also make a lovely face cloth. Wrap it up with some handmade soap - I love these by Saffronbarr - and you have a perfect gift for a friend!

Please don't be put off by the rows of numbers! It is only knit stitches and purl stitches. Just take each row at a time...

Using 4mm needles and craft cotton or any other DK cotton yarn cast on 45 stitches.

Row 1-7 : Knit
Row 9 : Knit
Row 10 : k5, p35, k5
Row 11 : k13, p2, k15, p2, k13
Row 12 : k5, p7, k4, p13, k4, p7, k5
Row 13 :  k11, p6, k11, p6, k11
Row 14 : k5, p5, k8, p9, k8, p5, k5
Row 15 : k9, p10, k7, p10, k9
Row 16 : k5, p3, k12, p5, k12, p3, k5
Row 17 : k7, p14, k3, p14, k7
Row 18 : k5, p2, k14, p3, k14, p2, k5
Row 19 : k6, p16, k1, p16, k6
Row 20 : k5, p1, k16, p1, k16, p1, k5
Row 21 : k6, p16, k1, p16, k6
Row 22 : k5, p1, k7, p2, k7, p1, k7, p2, k7 p1, k5
Row 23 : k7, p5, k4, p5, k3, p5, k4, p5, k7
Row 24 : k5, p3, k3, p6, k3, p5, k3, p6, k3, p3, k5
Row 25 : Knit
Row 26 : k5, p35, k5
Row 27 : Knit
Row 28 : k5, p35, k5

repeat rows 11-28 twice more.

Knit 7 rows and cast off.

Sew in ends.


There you have it - a simple way to pretty up your kitchen and make washing the dishes a little more pleasurable. Or a little less of a chore at least...

*Abakhan send me all the materials I need for my Creative Budget posts. No other payment has been received. All words, pictures and tutorials are my own.

Tuesday, June 25, 2013

Pretty pot holder tutorial

A few weeks ago I showed you my latest bundle of pretties from Abakhan and a tutorial for an easy peasy reversible tea towel.


Now I am going to show you how to make a really cute matching pot holder - an essential piece of kitchen kit if, like us, you have a stove top kettle (boy, does that handle get hot!).


You will need

  • 2 x 15cm squares of your chosen fabrics (make sure they are natural fibres - cotton, linen or wool - polyesters are really not a good idea near heat!)
  • 2 x 15cm squares of cotton batting/wadding or a couple of layers of old cotton towel 
  • bias binding
  • matching thread


Sandwich your squares together with both of your chosen outer fabrics right way out and layers of cotton wadding in between.

Using a ruler ( I used an old plastic 30cm ruler from school) mark out a diagonal grid on the fabric with light pencil marks, tailors chalk or vanishing fabric marker pen. Pin through the stack to hold it together then stitch along the lines - by hand or machine - to quilt your fabric.


If you have used a machine it should look something like this...


flip it over...


All quilted - it really is that easy!

Now to add the bias binding.  Start in one corner. Open up the binding and place the edge of the binding up against the raw edge of your quilted square.


Pin it in place if it helps and, using neat back stitches sew it into place along the crease, easing it around the corners as you go.


Try and keep the stitches small and even - you won't see them but it makes for a neater finish! You can machine stitch if you prefer, it is much quicker, but I find it much easier to get the corners right when I do it by hand!

When you get back to where you started leave a length of binding a couple of inches long - this will be turned into the hanging loop.   Now fold the binding over the raw edge of your pot holder and, using a whip stitch to catch the binding to the layers of fabric...


Again try and keep the stitches small and neat as you will see these ones and ensure the binding covers over the back of the row of stitching you did to attach the binding to the other side. When you get back to your first corner continue the whip stitches up the length of binding to catch the two sides together then fold it round to create a loop and stitch the end down


And there you have it - one pretty pot holder to match my pretty reversible tea towel!


I have enough fabric  and wadding left over to make oven gloves too - there are lots of tutorials online like this one from Liberty or maybe this double mitt from a little gray.  I promise I'll show you the result.

I do still have one more tutorial for you from the 'kitchen makeover' Creative Budget bundle - the knitty one I promised yesterday.  It's coming soon...


Saturday, May 25, 2013

#CreativeBudget - Pretty Reversible Tea Towel Tutorial

Sometimes, when money is tight, you just have to make do with what you have - even if it is falling apart/unpractical/you just hate it.

My kitchen is a prime example.

 The oven died the week before Christmas a couple of years ago. We had no money so we had to settle for the cheapest one we could get delivered and fitted as quickly as possible. What we had hoped to do was wait until the January sales to replace the dying cooker but fate clearly decided that was not going to be an option. The oven we ended up with truly was cheap and nasty - it works but the temperature gauge is iffy and the dial seems to turn by itself and heat the oven way too high resulting in stuff burning if you turn your back for five minutes. Unfortunately the company who supplied and fitted it (badly) have since gone bust and disappeared. We can't afford another so I'm stuck with it.

My sink is the same - a horrid white 'textured' plastic thing  - textured means it traps every speck of dirt that comes close to it and white means the dirt shows - no matter how hard I scrub it with bleach!  But it's a non standard size so not just a simple case of ripping it out and sticking a nice shiny stainless steel one in.We would need new worktop too...

 But we have no spare money so we have to make do.

 (I did manage to get some new cupboard doors for free a while back - they're not perfect but they were a lot better than the drab grey we had before! You can read about that here )

Thankfully there are ways you can change things up a little without spending too much cash!

My Abakhan creative budget project this month has been all about cheering up my kitchen and I had this little bundle of sweetness to do it with...


1 metre red cotton Gingham
1 metre sky blue strawberry print cotton (currently out of stock)
red gingham bias binding
blue polka dot bias binding
sky blue cord
100g ball white craft cotton


Nothing says cosy country kitchen better than red gingham don't you think? And the beautiful sky blue cotton  with strawberries and polka dots (always a winner in my book) is just perfect for kitchen accessories. Bright red and sky blue is one of my favourite colour combinations too!


The first thing I made with my fabric was this really simple reversible tea towel.

Simple Reversible Tea Towel Tutorial


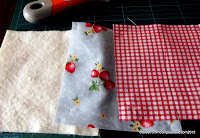
You need four pieces of fabric - One 45cm x 45cm and one 15cm x 45cm in main fabric plus one 45cm x 45cm and one 15cm x 45cm in a contrast fabric.

Pin the small contrast fabric rectangle to the main fabric square along one 45cm edge and sew together using a 5mm seam allowance.
Do the same with the contrast fabric square and the small rectangle of main fabric.
Press the seams open.

You should now have 2 rectangles of fabric measuring approx 60cm x 45 cm


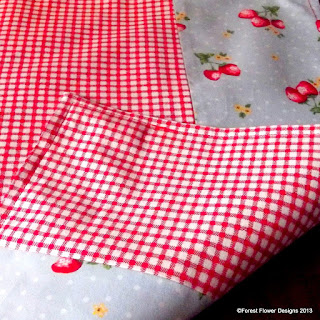
Pin your two rectangles right sides together, making sure you line up the seams where you have joined the panels as best as you can, and stitch all the way around, again using a 5mm seam allowance.

Leave a 10cm gap on one edge so you can turn your work the right way round. Trim the corners, turn and press.


Sew a row of top stitching (that's just a normal straight stitch that is visible rather than being a seam) in a contrast thread - I used red - as close to the edge of the tea towel as possible - this holds the fabric in place and closes up the gap you left to turn.

And that is it. Simples.


I love it! (I may have to force myself to actually use it though - it's so pretty!)

I think a bundle of these in co-ordinating fabrics would make a wonderful new home gift.  Add a matching pot holder, oven gloves, an apron and pretty knitted dishcloth (tutorials for all of these will follow in the next couple of weeks) for a pretty and practical gift that can easily be customised to suit the tastes and decor of the recipient.And all for under £20.


P.S.  Polka dots and gingham not your thing? Abakhan have a great selection of 100% cotton fabrics that would work well for this project. I am particularly loving this bird print which would look lovely with the checks or stripes.


As always I had a £15 budget to spend at Abakhan who supplied this bundle of goodies free of charge. No other payment has been received.

Tuesday, April 16, 2013

Creative Budget - Pom Pom crazy!

Do you remember the cute felt Easter Egg decorations I made as part of my Spring Creative Budget challenge with fab craft materials from Abakhan? Well, as promised, here is my Spring Creative Budget challenge part 2!


One of the trends I am loving right now is the resurgence of the humble pom pom. Once beloved of grannies who knitted your winter woolly hat and decorated tea cosies with them, they are now being used to create everything from cushions and rugs to window dressings and wall art!

What better way to brighten up your home this Spring than by hanging a pretty pastel coloured pom pom garland somewhere bright and sunny....

Pom poms are so easy to make - did you ever make them as a child, the old fashioned way with 2 rings of cardboard sandwiched together? These days with fab little pompom makers readily available pom pom making has got even easier. I picked up a set of 4 different sizes for a few quid from Ebay and if you are going to make a lot of pom poms I really recommend that you invest in a set!  You can even get ones that make heart shaped pom poms! Imagine how beautiful a heart pompom garland would be...

So the first thing you need to do is make a load of pom poms... (there are plenty of tutorials online if you have never actually made one before!)

a whole load of pom poms!


Do you see the cute rainbow coloured pompoms? Want to know how to make them?


Take your first colour and wrap around the pom pom maker (or your cardboard circles if you are using them). Keep the yarn evenly spaced.

Cut the yarn and take your next colour...


I used yellow next then mint green then lilac - can you see how the layers are building up nicely?

When you have used all the colours you want close up the two halves of the pom pom maker and clip together...


snip around the edge to reveal cute pastel rainbow stripes!

Finish off the pom pom as per maker instructions and there you go!

I am already thinking black and orange stripey ones for Halloween and red and white for Christmas!


Once you have your basket load of pom poms all you need to do is thread them on to a long length of yarn - mine are random colours and sizes but you can arrange yours in a pattern if you prefer.  You'll need a fairly long wool needle - I used a doll making needle - to get through the larger pom poms without pulling half the strands out! Space the pom poms out along your thread carefully (they should stay in place without any additional knots) then hang in a bright spot and enjoy!

pretty pastel rainbow pom pom


I love the way this garland brightens up my hallway - it gives it a kind of welcoming feel that has been missing since the Christmas tinsel came down. You can use these garlands anywhere though - pretty up a babies room (make sure it is hung well out of reach of young children and cats. You do not want to know how quickly one kitten can shred a batch of pom poms...) or use instead of bunting for parties.  How pretty would colour co-ordinated pom pom garlands look at a handmade wedding celebration?

If you need anymore inspiration once you have mastered/rediscovered the art of pom pom making check out my pinterest board...


I used Hayfield Bonus DK yarn supplied bt Abakhan for this project. My garland measures approximately 2m long and used less than half a ball of each of the 5 colours I chose so there is plenty left over for another project. Or more pom poms ;-)

Sunday, March 24, 2013

Creative Budget - Easter Egg decorations


It's Creative Budget time again and here is the little bundle of goodies I received from Abakhan for my latest challenge.


Today I am going to show you what I did with all that lovely felt...


Easter Egg Decorations

These cute little embroidered felt Easter Eggs are just the thing for bringing a little Easter cheer into your home and they are so easy to make.

Draw yourself an egg shape template onto card (I used an empty cereal box) You can make you eggs whatever size you like - a display with a mix of sizes would be cool - mine measure approx 6.5cm x 4.5cm.


Fold your felt square in half and draw around your template. Pin through the two layers of felt before cutting out your egg shapes.


Cut a small piece of ribbon to match (or clash beautifully) and pin it between the layers to make a loop at the top of your egg.

Now take a length of embroidery floss in a coordinating colour and stitch around the edge of your egg with small running stitches or, if you refer you could use a blanket stitch. (I used 2 strands doubled for both the outer seam and the embroidered detail) Stuff lightly for a padded effect before finishing the seam.


Now you can decorate your egg - I used different colours of embroidery floss and decorative stitches but you could do anything you want - let the littlies join in and glue feathers, sequins and googly eyes on the the eggs or go for something a little more sophisticated and use tiny seed beads to embellish your stitching.


Hang your pretty Easter Egg decorations around the place to bring a little eggy cheer to your home!


How about making a whole stack of hanging eggs and hiding them around the house or garden for an Easter Egg hunt? 

I still have a little pile of these to decorate - as the Little Man has finished school for the Easter hols I may even let him have a go too! I promise to show you the results later in the week...

But what about all that lovely pastel coloured yarn? Well, I'll save that for next week but if you want a clue just visit my inspiration pinboard here  ;-)

Tuesday, March 19, 2013

So many projects, so little time...

I have so many little projects stacking up at the moment, when I get a little time to myself I hardly know which one to work on!

Here's a beaded necklace I am working on for my mum...


It's in lovely spring colours - fresh greens, blues and yellows. It is supposed to be a gift for her wedding anniversary next week. I hope I can finish it in time but beading work is so time consuming and the kitten always wants to join in...


Then there is little dragon softie...  I made one of these for a newborn nephew of a friend and it proved very popular amongst my Forest Flower facebook page likers!  This one, also commissioned by a friend ( I have some fab friends!) is unashamedly girlie with green leafy patterns and gorgeous Tilda roses fabric.


I've used a selection of matching stitched and polka dot ribbons from my Jane Means stash to make the 'spikes' down this dragon's back - don't they look lovely?  

Another 'new baby' gift commission is this personalised star... for a little Star!


Made with the reverse applique technique I use for my popular heart decorations using felt with a pretty fabric insert embroidered with baby's name. I am really pleased with how this one turned out - I think it may be coming to my Folksy shop very soon!!

Finally I have a very cute Easter make as part of my Abakhan Creative Budget challenge. I am currently putting a little tutorial together for this make that will go live by the end of the week giving you just enough time to source some supplies and make for Easter weekend. I hope you like them!


phew...  now I just need a few extra hours - preferably while everyone else is asleep!!!

Wednesday, January 30, 2013

#CreativeBudget - DIY cosy rug

I have had a little break from the Abakhan Creative Budget challenge for a few months but this month it's back and I have a lovely little how-to for your home.


As ever I had a budget of £15 to spend - here is what I got*


1m Organic Cotton Hopsack drill in 'natural'
1m 'Lambskin' fur fabric in ecru
5m Beresfords double face satin ribbon 50mm in khaki

*now admittedly I ordered these items during the sale and they came in at £14.74 - at current website prices this little bundle will cost you £18.20 - still a bit of a bargain, I think you'll agree!

and this is what I did with it...


DIY Mitred Corner rug with ribbon trim.

Take your metre of cotton drill, fold it half width ways and cut into two pieces measuring approx 1m x 75cm. Put one piece aside - this will be the backing for your rug.


Cut the other piece into 4 strips -  two measuring 100cm x 15cm and two measuring 75cm x 15cm. These will form the 'frame' of your rug.


Cut 4 lengths of ribbon - two 100cm long and two 75cm long. Position these centrally along the 'frame' pieces.
I did this by folding a 5cm 'hem' along the long edge of my drill fabric and ironing the crease in. You can then align one edge of the ribbon to this crease and it will be perfectly central all the way along!


Pin the ribbon in place before machine stitching using a small zig zag stitch. Satin ribbon can be quite slippy so don't rush it and take care that it doesn't slide out of position.


To create the mitred corners take one longer and one shorter piece and pin them together at one end, right sides facing, ensuring that the ribbon trim on both pieces is aligned.  Measure in 15cm from bottom corner and draw a diagonal line from this point up to the top corner. Machine stitch along this line.


Trim off the excess fabric and press the seam open (make sure you place a tea towel or an off cut of fabric over the ribbon ends when you iron as the hot iron will melt the ribbon!)


Repeat with the other long and short piece and join the two pieces together to finish off your frame


Now you need to measure the long and short inside edge of your frame. Add 5cm  to these measurements (to allow for the frame not being totally 'square' ) and cut out your centre panel in the lambswool fleece fabric.  Place the frame and the fleece face down on your table and, starting from the centre of one short side begin pinning the two pieces, right sides together.

Once you have pinned all the way around, hold the mat up and check the centre panel is 'square' and the mat is not distorted. Then, using long stitches, tack the pieces together, removing the pins as you go. Now you can turn the mat over and place it on the floor to double check it will lie correctly before you machine stitch (tacking stitches are much easier to undo than machine ones. Trust me!)


When you are happy that your central panel is positioned correctly trim away the excess fleece fabric and machine stitch it in place - I found it easier to treat each side as a separate seam rather than try and go all the way round in one go as the corners were quite bulky.


 Finally take the other piece of the hopsack drill fabric. Pin it to your mat, right sides together and, leaving a gap for turning, stitch all the way around. Trim the seams, press them open and turn. Slip stitch the opening together. Give your mat an iron (on the back - your ribbon and fleece will both melt if they come into contact with a hot iron!!!) , lay it on the floor and stand back to admire your handiwork!


I am really pleased with the result! Yes it's a little wonky but that gives it character. Now I have mastered the 'mitred corner' I will definitely be making more of these floor mats for other rooms as it lends itself to being altered in a number of ways. I used the thick hopsack twill fabric because I wanted a sturdy rug that would stand up to a bit of use (and abuse) but you could use any pretty fabric if your mat is going into a low traffic area like your bedside (imagine sinking your feet into that cosy fleece every morning!). You could use fabric strips instead of ribbon for the trim or use towel for the centre panel and you have a bathmat.

You'll have noticed that our new kitten (more about him in another post) has taken rather a shine to the fleece centre and as I used only a tiny bit of the metre of fabric I ordered I have an idea of how to make use of the rest.  Stay tuned - I will blog that project at a later date...


ps -  apologies for the bad photographs. This project was done during the Snow Week and the natural light I usually take advantage of via our conservatory was all blocked out by about 10" of snow on the roof!

pps - if you would like to see more fab Creative Budget projects, Abakhan have just set up a board on Pinterest showcasing them all! You can follow it here
Related Posts Plugin for WordPress, Blogger...
Blogging tips