

Showing posts with label crafts. Show all posts
Showing posts with label crafts. Show all posts
Wednesday, October 22, 2014
Tuesday, March 18, 2014
Tuesday Tutorials
 | |||
Tuesday, July 30, 2013
Works-in-Progress Linky - I'll show you mine if you'll show me yours...
Welcome to the very first works in progress linky post - aka WIPsLinky!
I am really excited to get this idea up and running - I really hope that now you are here and reading you'll want to join in too. If this is your first visit to my blog here is the post I wrote last week as an introduction to the WIPsLinky idea. Go have a read if you like. I'll still be here when you get back...
Hello again!
So I am going to show you a couple of projects I am working on right now - both of them seem a little incongruous given the warm weather we have been having of late but, as most crafters (particularly those who knit or crochet) know there is no point in waiting until it's cold to create things to keep you warm...
First up - I have had some Hayfield Bonus Galaxy yarn floating around for some years. I think I bought
it with the intention of making something cute and snuggly for Roo when
he was tiny but didn't get around to it. It's been discontinued so I am unlikely to be able to get any more and I only have 2 balls each of blue and green. So I am using a 5mm crochet
hook and making a pile of basic closed granny squares - I have
absolutely no idea how many my yarn will make or what I'll do with them
when they are done ( Lap blanket? Cushions?) but it feels kind of good
to finally be using something that has been stashed away for best part
of 5 years! When I have used up all the yarn I will make the decision.
I love that granny square projects are so portable, all you need is your hook and some yarn. Even if you are bit rusty, like me, you only need to make a couple with a pattern in front of you before you can whip them up without the pattern wherever you are!
Next up is one of those projects I have been waiting to start for a long time. The pattern came from my mum's collection of 'The Knitter' magazines. We love 'The Knitter' because it is aimed at more experienced knitters than most mainstream knitting mags and has some wonderfully challenging projects.

This one is a cabled blanket made up in panels of different sizes with lovely, intricate cable patterns on each panel. I adore cable knits - there is something inherently snuggly about a chunky cable knit don't you think? I love them so much I have a whole Pinterest board devoted to them!
Anyway, the biggest hold up has always been getting the yarn - this throw uses a lot of yarn - as is the way with all these patterns the specified yarn, although beautiful (50% wool/50% lama!) is WAAAAYYYY out of my budget! Luckily for me my mother-in-law had some rather nice wool mix arran yarn from Stylecraft in a beautiful charcoal grey colour - enough to knit this whole blanket in the same colour instead of a rainbow patchwork (although that would be nice too!).

I have started on the first panel - a long, thin strip of cabling that basically an 8 row repeat. It's not too complicated and doesn't require much concentration so it's good to do while watching tv. I have a feeling the large Celtic knot panels might require a bit more focus though!

We're off on holiday tomorrow so I will be taking this one with me, just in case the weather does it's worst. After all what is a holiday but an excuse to knit for hours on end without feeling remotely guilty?
So there you have my current Works-in-Progress - now show me yours!
Link up your #WIPsLinky blog post below. If you want you can add a link to this post at the end of your post (I am working on a 'grab my button' code. Honest!)
Please use the #WIPsLinky hash tag on Twitter/Google+/Facebook if you want to shout about this linky to your friends too! I will also be setting up a WIPsLinky pinboard on Pinterest.
I am looking forward to seeing what you are up to!
ps: the Linky will be posted on the last Tuesday of each month, the current one will stay open until the day before new one comes up so you have plenty of time to link up and join in!
I am really excited to get this idea up and running - I really hope that now you are here and reading you'll want to join in too. If this is your first visit to my blog here is the post I wrote last week as an introduction to the WIPsLinky idea. Go have a read if you like. I'll still be here when you get back...
Hello again!
So I am going to show you a couple of projects I am working on right now - both of them seem a little incongruous given the warm weather we have been having of late but, as most crafters (particularly those who knit or crochet) know there is no point in waiting until it's cold to create things to keep you warm...
 |
| crochet in the park... |
I love that granny square projects are so portable, all you need is your hook and some yarn. Even if you are bit rusty, like me, you only need to make a couple with a pattern in front of you before you can whip them up without the pattern wherever you are!
Next up is one of those projects I have been waiting to start for a long time. The pattern came from my mum's collection of 'The Knitter' magazines. We love 'The Knitter' because it is aimed at more experienced knitters than most mainstream knitting mags and has some wonderfully challenging projects.
This one is a cabled blanket made up in panels of different sizes with lovely, intricate cable patterns on each panel. I adore cable knits - there is something inherently snuggly about a chunky cable knit don't you think? I love them so much I have a whole Pinterest board devoted to them!
Anyway, the biggest hold up has always been getting the yarn - this throw uses a lot of yarn - as is the way with all these patterns the specified yarn, although beautiful (50% wool/50% lama!) is WAAAAYYYY out of my budget! Luckily for me my mother-in-law had some rather nice wool mix arran yarn from Stylecraft in a beautiful charcoal grey colour - enough to knit this whole blanket in the same colour instead of a rainbow patchwork (although that would be nice too!).

I have started on the first panel - a long, thin strip of cabling that basically an 8 row repeat. It's not too complicated and doesn't require much concentration so it's good to do while watching tv. I have a feeling the large Celtic knot panels might require a bit more focus though!
We're off on holiday tomorrow so I will be taking this one with me, just in case the weather does it's worst. After all what is a holiday but an excuse to knit for hours on end without feeling remotely guilty?
So there you have my current Works-in-Progress - now show me yours!
Link up your #WIPsLinky blog post below. If you want you can add a link to this post at the end of your post (I am working on a 'grab my button' code. Honest!)
Please use the #WIPsLinky hash tag on Twitter/Google+/Facebook if you want to shout about this linky to your friends too! I will also be setting up a WIPsLinky pinboard on Pinterest.
I am looking forward to seeing what you are up to!
ps: the Linky will be posted on the last Tuesday of each month, the current one will stay open until the day before new one comes up so you have plenty of time to link up and join in!
Tuesday, July 23, 2013
A new linky - share your WIPs!
I blog a lot of tutorials in my role as a Jane Means Ribbon Blogger and an Abakhan Creative Budget Blogger, as well as new Forest Flower designs when I add them to my Folksy shop but I don't often take the time to show off the little (and not so little) projects I work on - usually in the evenings whilst watching TV or listening to music - little things for the home, for Roo, presents for friends and family and those new techniques or ideas I spot on Pinterest or between the covers of Mollie Makes...
Some of these projects are on-going (which means I have been working on them forever!) Others are what I call 'Sunday afternoon makes' - little things I rustle up while the boys are watching the motorcycle racing. There is usually at least one gift being made, if not for an upcoming birthday than to go in the Christmas box. Occasionally I even make something for myself!!
I thought it would be a nice idea to start up a works-in-progress (aka WIPs) linky where we can all share the projects we are working on, the projects we would LIKE to start, the ones we need encouragement to finish...
I am planning to post the WIPs linky on the last Tuesday of each month - so the first one will be next Tuesday 30th July - and the linky will stay the whole of following month so as many of you as possible can join in. I will be working on a little bit of coding so you can add a badge to your post to encourage your readers to head over to the linky and join in and maybe discover some new blogs in the process.
I hope that lots of my crafty blogging friends will take join in once a month. Linkys are a great way to discover new blogs so I hope that all of you who do link up take the time to check out the other blogs on the linky too!
#WIPsLinky will be announced on Twitter/Facebook/Google+ so please follow/like/add if you want to see the reminder or subscribe to the blog by email and it will be sent directly to your inbox.
I look forward to seeing all of your works-in-progress next week!
Some of these projects are on-going (which means I have been working on them forever!) Others are what I call 'Sunday afternoon makes' - little things I rustle up while the boys are watching the motorcycle racing. There is usually at least one gift being made, if not for an upcoming birthday than to go in the Christmas box. Occasionally I even make something for myself!!
 | |
| a current WIP - should be completed by next week's linky... |
I thought it would be a nice idea to start up a works-in-progress (aka WIPs) linky where we can all share the projects we are working on, the projects we would LIKE to start, the ones we need encouragement to finish...
I am planning to post the WIPs linky on the last Tuesday of each month - so the first one will be next Tuesday 30th July - and the linky will stay the whole of following month so as many of you as possible can join in. I will be working on a little bit of coding so you can add a badge to your post to encourage your readers to head over to the linky and join in and maybe discover some new blogs in the process.
I hope that lots of my crafty blogging friends will take join in once a month. Linkys are a great way to discover new blogs so I hope that all of you who do link up take the time to check out the other blogs on the linky too!
#WIPsLinky will be announced on Twitter/Facebook/Google+ so please follow/like/add if you want to see the reminder or subscribe to the blog by email and it will be sent directly to your inbox.
I look forward to seeing all of your works-in-progress next week!
Tuesday, March 19, 2013
So many projects, so little time...
I have so many little projects stacking up at the moment, when I get a little time to myself I hardly know which one to work on!
Here's a beaded necklace I am working on for my mum...

It's in lovely spring colours - fresh greens, blues and yellows. It is supposed to be a gift for her wedding anniversary next week. I hope I can finish it in time but beading work is so time consuming and the kitten always wants to join in...

Then there is little dragon softie... I made one of these for a newborn nephew of a friend and it proved very popular amongst my Forest Flower facebook page likers! This one, also commissioned by a friend ( I have some fab friends!) is unashamedly girlie with green leafy patterns and gorgeous Tilda roses fabric.

I've used a selection of matching stitched and polka dot ribbons from my Jane Means stash to make the 'spikes' down this dragon's back - don't they look lovely?
Another 'new baby' gift commission is this personalised star... for a little Star!

Made with the reverse applique technique I use for my popular heart decorations using felt with a pretty fabric insert embroidered with baby's name. I am really pleased with how this one turned out - I think it may be coming to my Folksy shop very soon!!
Finally I have a very cute Easter make as part of my Abakhan Creative Budget challenge. I am currently putting a little tutorial together for this make that will go live by the end of the week giving you just enough time to source some supplies and make for Easter weekend. I hope you like them!

phew... now I just need a few extra hours - preferably while everyone else is asleep!!!
Here's a beaded necklace I am working on for my mum...

It's in lovely spring colours - fresh greens, blues and yellows. It is supposed to be a gift for her wedding anniversary next week. I hope I can finish it in time but beading work is so time consuming and the kitten always wants to join in...

Then there is little dragon softie... I made one of these for a newborn nephew of a friend and it proved very popular amongst my Forest Flower facebook page likers! This one, also commissioned by a friend ( I have some fab friends!) is unashamedly girlie with green leafy patterns and gorgeous Tilda roses fabric.
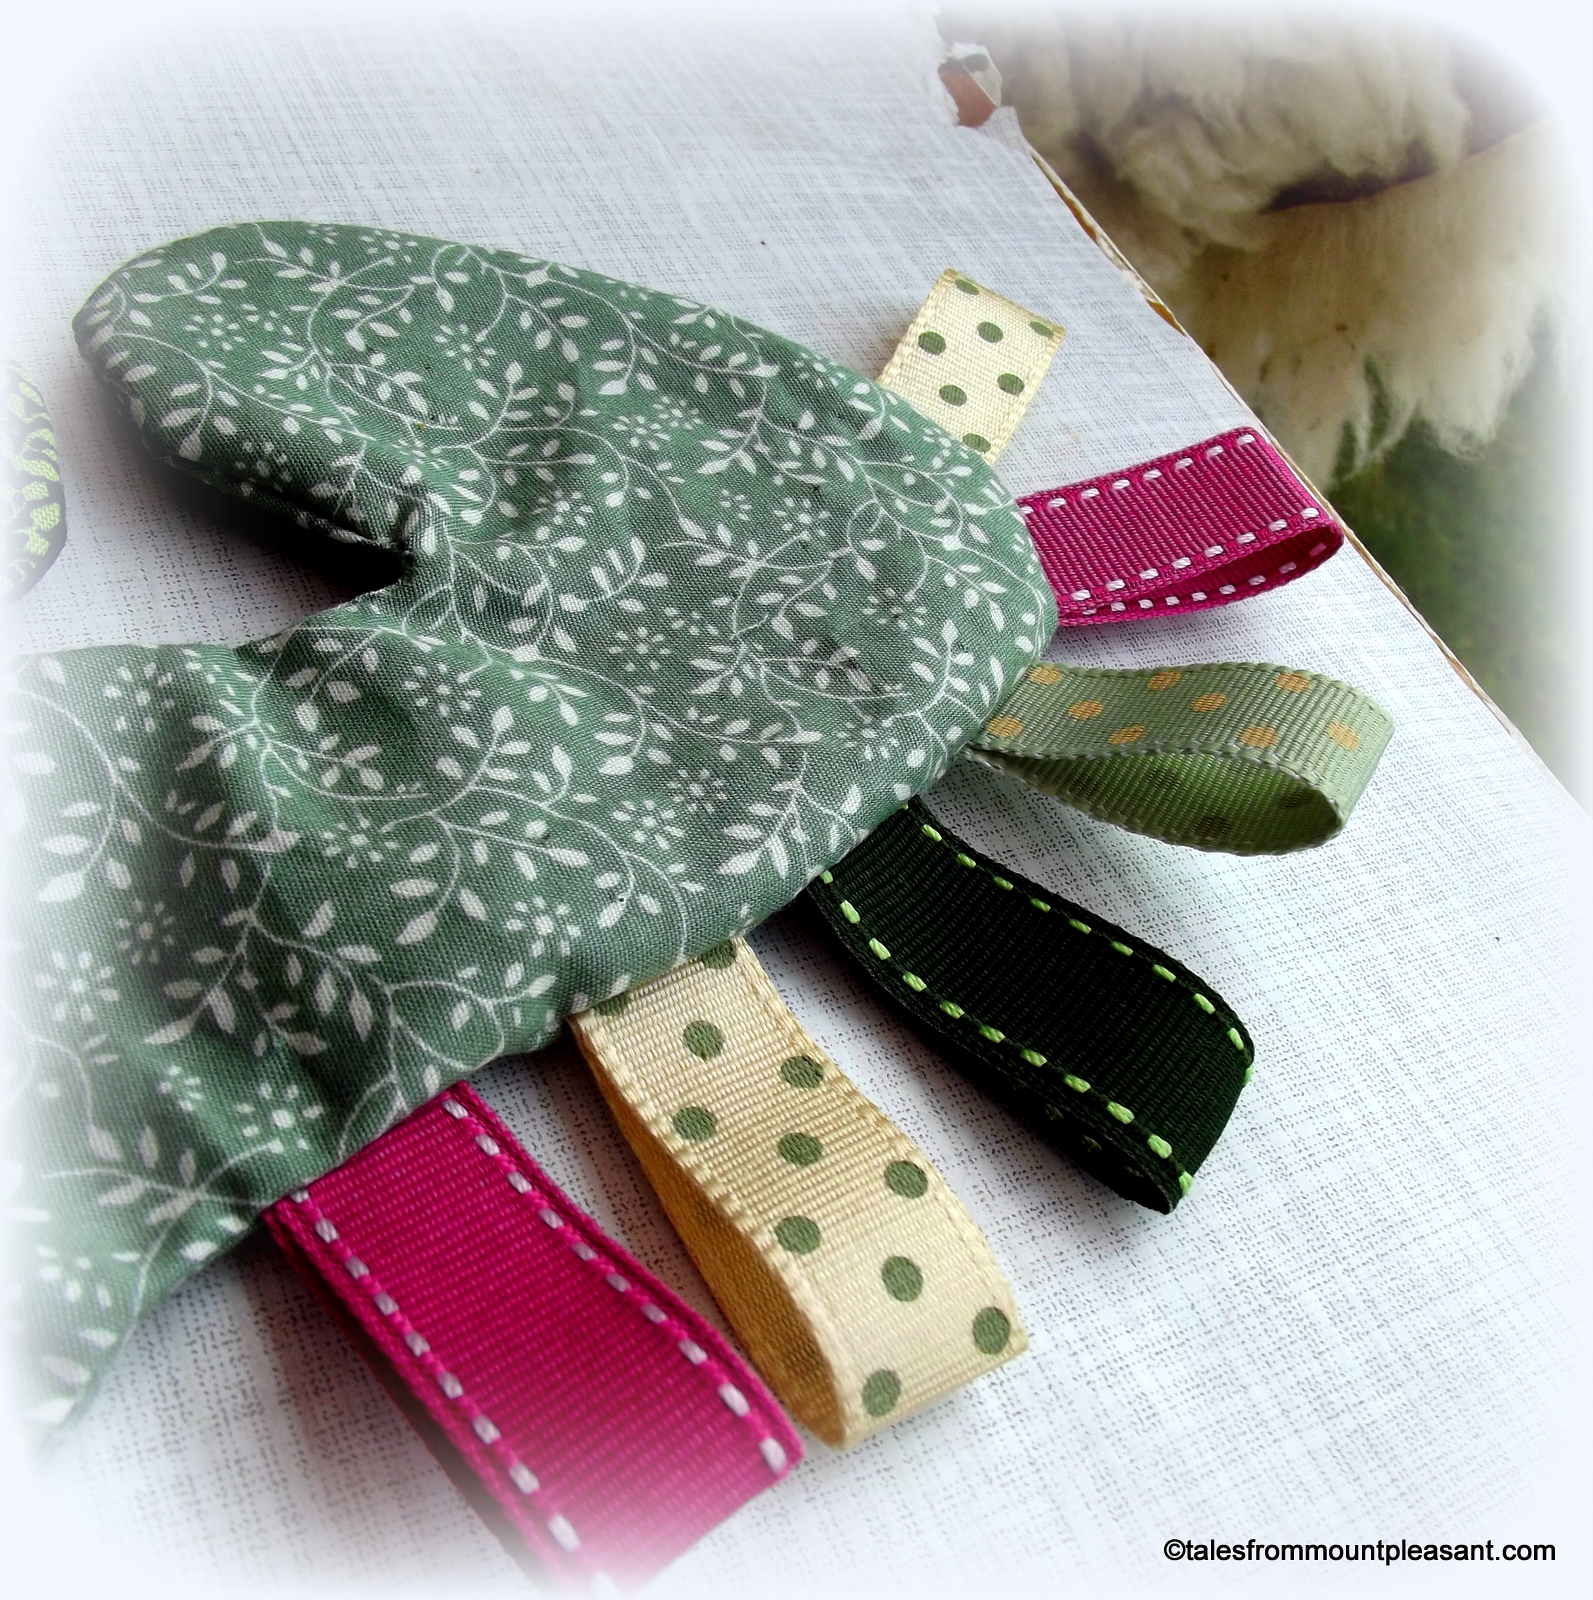
I've used a selection of matching stitched and polka dot ribbons from my Jane Means stash to make the 'spikes' down this dragon's back - don't they look lovely?
Another 'new baby' gift commission is this personalised star... for a little Star!

Made with the reverse applique technique I use for my popular heart decorations using felt with a pretty fabric insert embroidered with baby's name. I am really pleased with how this one turned out - I think it may be coming to my Folksy shop very soon!!
Finally I have a very cute Easter make as part of my Abakhan Creative Budget challenge. I am currently putting a little tutorial together for this make that will go live by the end of the week giving you just enough time to source some supplies and make for Easter weekend. I hope you like them!

phew... now I just need a few extra hours - preferably while everyone else is asleep!!!
Friday, February 01, 2013
Pin it to WIn it! - A Crafty Competition from Abakhan
 As I mentioned in my previous post those lovely folks over at Abakhan have finally got themselves on Pinterest - you can follow them here - and to celebrate they have launched a brand new competition.
Follow the instructions below and you could win yourself a £20 voucher to spend on any Abakhan goodies you like!

Easy peasy - who doesn't love spending hours browsing and pinning lovely crafty goodness, or is that just me?
So what are you waiting for? There is a huge range of crafting essentials to be found on their website from knitting, crochet and felting to patchwork, toy making and clothes patterns. There are plenty of children's crafty things too - fabric paints (we used them to make a fab 'Retro Rocket' softie here), funky foam, Fimo modelling clay and lovely sew-your-own kits. The only trouble you might have is choosing products for only ONE project!
Good luck!
ps - If you don't have a Pinterest account already, it's very easy to set up. Just be warned it will suck away the hours like nothing else . . . (in the nicest possible way :-) )
Tuesday, November 06, 2012
Woven Ribbon Lavender Pillow Tutorial
 Now we have Bonfire Night out of the way, I guess it's time mention the 'C' word...
Let's not get too festive and sparkly just yet (no, really, plenty of time for that NEXT month!) but those of you who aspire to a Handmade Christmas really should start thinking pressies if you haven't already. I have about 5 half completed pressie projects on the go at the mo. I'm not panicking. Yet.
I've raided my Jane Means ribbon stash again to come up with this stylish gift idea - and it's a great way to use any lavender you may have dried in the summer!
You will need a couple of meters of your chosen ribbon - I have used these lovely polka dot grosgrain ribbons in co-ordinating turquoise and chocolate brown - a couple of small pieces of fabric and some dried lavender.
First decide on the size of your pillow and cut out two pieces of cotton fabric approx 2cm larger than you want the finished size to be. Mine measures 10cm x 8cm finished so my base fabric pieces were approx 12cm x 10cm.
If your pillow is oblong, like mine, you will need to cut shorter lengths in one colour to fit the width and longer lengths in the contrast colour. I used 7 x 10cm lengths of the turquoise ribbon and 6 x 12cm lengths of the chocolate brown ribbon.
Now, using one of the fabric pieces as your base begin weaving your ribbon strips. You may find it easier to pin the ribbons to the fabric or tack them in place around the edges as you go

Try and keep the ribbons matched up edge-to-edge for a neat finish. It's a bit fiddly but don't worry about it too much as you have the base fabric underneath to stop and lavender escaping the finished pillow!
When all the ribbon strips are in place and secure take you other piece of fabric and lay it, face down, on top of the ribbon panel. Pin, tack and stitch all the way around, leaving an opening in the middle of one long edge to turn the pillow the right way round.
Turn, stuff with dried lavender, stitch up the gap and you're done!!

These pillows are so easy to adapt too - use wider ribbons to make larger pillows. Use up your ribbon scraps and make a lovely colourful boho inspired pillow. Use all one colour for an elegent textured look. You'll find loads of gorgeous ribbons on Jane Means website if you need any further inspiration!
Monday, November 05, 2012
Craft Fair Conundrum...
This weekend we (that is me, the Little Man and MIL) had a table at a popular local craft fair - we tried to get into this one two years ago but was told in September that we had applied to late (for the end of November!) so last year we made sure we booked in August. Several people had told us it was a 'BIG ONE', a popular fair that was well supported and always busy. So we hoped we would do well with our mix of my designs and my Mother in Law's hand knits plus some little gift items from her daughter's shop. We sold nothing. At. All.
Maybe it was a one-off. The weather was bright on the day but there was snow on the ground which may have kept people away. Everyone was lovely, the atmosphere was friendly, the home cooked food available from the hall kitchen was fab. But not one person wanted to take anything we had to offer home with them..
We thought we would try again this year. Beautiful weather (no snow this time), same lovely atmosphere and definitely a few more people. This year we sold a few items but once coffee and lunch was factored in we barely covered the cost of fuel...
And this, I'm afraid, seems to be the case with most craft fairs we attend. People look. People 'oooo' and 'aaaahhh' and comment how beautiful this is or how much so-and-so would love that, but people don't buy! It's enough to make me cry with frustration!! The matter is not helped by hobby crafters turning up with their hand knitted blankets they are selling for under a tenner . . .
Do people really not realise how much TIME these things take to produce, how much supplies actually cost? Or have they been so blinkered by stupidly cheap supermarket buys (mass produced in India/China by workers who get paid pennies for their work so supermarket profits on these items are far in excess of anything I would expect to make on my handmade items...) that they simply do not truly value craftsmanship anymore?
I spoke to one lady who produced the most gorgeous ceramic buttons - she actually apologised to someone for charging £1 per button! Everyone of her items was an individual work of art and she felt the need to justify what is, in reality, a bargain price (look at the price of buttons next time you are in Hobbycraft if you don't believe me!) I purchased four beautiful porcelain hanging star decorations from her for £1 each and I very much doubt I will find anything so lovely in Tesco...
This is not the first fair I have done, I probably have a dozen or so under my belt now, and it probably won't be the last but I have yet to have a truly successful fair. One where I felt that the people browsing were actually there because they want to purchase unique items, hand crafted with love and skill. Maybe we need to move further afield. Maybe we need to pay more to attend 'premium' fairs. I don't know...
I don't know if the story is the same where you are? Have you ever set up a stall at craft fair and left feeling despondent? Do you worry that your craft simply isn't good enough? Or maybe you have had great success at the fairs you have attended. Maybe you go as a punter and are disappointed with the goods on offer or just go along to support your mate who has a table but rarely buy.
Let me know your thoughts on craft fairs - from either side of the table.
It may make the difference to me and others as to whether the next fair is a successful one or the last one . . .
 |
| craft fair table display |
We thought we would try again this year. Beautiful weather (no snow this time), same lovely atmosphere and definitely a few more people. This year we sold a few items but once coffee and lunch was factored in we barely covered the cost of fuel...
And this, I'm afraid, seems to be the case with most craft fairs we attend. People look. People 'oooo' and 'aaaahhh' and comment how beautiful this is or how much so-and-so would love that, but people don't buy! It's enough to make me cry with frustration!! The matter is not helped by hobby crafters turning up with their hand knitted blankets they are selling for under a tenner . . .
Do people really not realise how much TIME these things take to produce, how much supplies actually cost? Or have they been so blinkered by stupidly cheap supermarket buys (mass produced in India/China by workers who get paid pennies for their work so supermarket profits on these items are far in excess of anything I would expect to make on my handmade items...) that they simply do not truly value craftsmanship anymore?
 |
| beautiful handmade porcelain star |
This is not the first fair I have done, I probably have a dozen or so under my belt now, and it probably won't be the last but I have yet to have a truly successful fair. One where I felt that the people browsing were actually there because they want to purchase unique items, hand crafted with love and skill. Maybe we need to move further afield. Maybe we need to pay more to attend 'premium' fairs. I don't know...
I don't know if the story is the same where you are? Have you ever set up a stall at craft fair and left feeling despondent? Do you worry that your craft simply isn't good enough? Or maybe you have had great success at the fairs you have attended. Maybe you go as a punter and are disappointed with the goods on offer or just go along to support your mate who has a table but rarely buy.
Let me know your thoughts on craft fairs - from either side of the table.
It may make the difference to me and others as to whether the next fair is a successful one or the last one . . .
Saturday, August 11, 2012
#CreativeBudget - Fabric Painting Fun!
It's that Creative Budget time again (if you don't know what I'm talking about here is my first Creative Budget post with a little more about the idea behind it!)
You may have noticed that I missed a July post - this was mainly due to a lot of other commitments and the Little Man finishing nursery and suddenly being at home all the time! This month I thought long and hard about creating a project that could be enjoyed by kids of all ages. I wanted to make something that the Little Man could take an active role in creating AND that he would be able to play with long after the craft tools had been packed away...
There are so many different products to chose from on the Abakhan website but I finally made my selections and spent this month's budget on 1m of bleached calico fabric, a Dylon Colourfun fabric marker pen in black and half a dozen tubes of Leeho fabric paints in bright colours.
And this is what we did with them...

First of all wash your calico - this ensures there are no residues let from the manufacturing process that may stop the fabric paint from taking properly. Once it was dry we cut the fabric into quarters and laid one out flat. Using the Dylon marker, I drew a basic picture of a rocket. This fabulously retro rocket was copied out of Little Man's favourite colouring book :-) Make sure you leave enough room to cut out around the outline of the picture with a couple of centimetres to spare.
Set the outline by ironing over it with a hot iron.

Now lets get painting! You can use the Leeho fabric paints straight from the tube and create patterns/doodles/writing using the fine nozzle tip (takes a bit of practise and better for older kids to do) or you can squeeze a blob of paint out and spread it around with a paintbrush for more coverage. Little Man happily got stuck in and even managed to stay within the outline most of the time! The paints are water based so wash out of the brush and off hands easily (they are permanent once dry so wear old clothes or an apron whilst painting!)

Once you have finished colouring your picture you have to leave it to dry flat overnight.

Once the paint is completely dry pin another quarter over the top. You should be able to see your painted picture through the fabric enough to be able to trace an outline. Use a sharp pencil to lightly sketch the outline allowing approximately 2cm around the edge of the picture. Don't worry about following the picture outline exactly, a general outline will be easier to sew!

Then you need to stitch around the outline - by hand or machine - leaving a gap to turn and stuff in a suitable place in the seam. Then trim all the excess fabric away about 5mm from the stitches, snipping into curves and notching corners to reduce fabric bulk.
Leave a little extra seam allowance where you have left the opening to make it easier to stitch up the seam when you have finished stuffing.

Turn your cushion the right way round and press it lightly with a warm iron on the back, easing it into shape.
Now we can stuff it. Fill in the extremities first using small amounts of stuffing at a time. I use a chopstick to help push the stuffing into little spaces. The Little Man joined in on this bit too adding lots of stuffing in the middle.
Make sure you stuff your pillow fairly firmly so it keeps it's shape - for a pillow this size you will need about 200g of toy stuffing.
When you have finished stuffing, stitch up the opening.


I finished off our pillow with a label, written with the Dylon marker pen and blanket stitched in place on the back of the pillow - just a little reminder that we made this together. I hope it's something he will keep and cherish for years to come!
OK - I cheated a little teeny bit with this month's Creative Budget - the fabric and paints came in at a few pence more than my £15 budget and I used toy stuffing I already had, BUT we still have half a metre of calico and plenty of fabric paint left for another project or two. Maybe an alien pillow to go with our rocket? ;-)
Calico can be used for all sorts of projects - how about a personalised P.E bag to take back to school? Or make a simple tote bag and get the kids to decorate it for you. It's guaranteed to bring a smile to everyones face when you fill it with shopping at the supermarket checkout.
You may have noticed that I missed a July post - this was mainly due to a lot of other commitments and the Little Man finishing nursery and suddenly being at home all the time! This month I thought long and hard about creating a project that could be enjoyed by kids of all ages. I wanted to make something that the Little Man could take an active role in creating AND that he would be able to play with long after the craft tools had been packed away...
There are so many different products to chose from on the Abakhan website but I finally made my selections and spent this month's budget on 1m of bleached calico fabric, a Dylon Colourfun fabric marker pen in black and half a dozen tubes of Leeho fabric paints in bright colours.
And this is what we did with them...
Rocket play cushion

First of all wash your calico - this ensures there are no residues let from the manufacturing process that may stop the fabric paint from taking properly. Once it was dry we cut the fabric into quarters and laid one out flat. Using the Dylon marker, I drew a basic picture of a rocket. This fabulously retro rocket was copied out of Little Man's favourite colouring book :-) Make sure you leave enough room to cut out around the outline of the picture with a couple of centimetres to spare.
Set the outline by ironing over it with a hot iron.

Now lets get painting! You can use the Leeho fabric paints straight from the tube and create patterns/doodles/writing using the fine nozzle tip (takes a bit of practise and better for older kids to do) or you can squeeze a blob of paint out and spread it around with a paintbrush for more coverage. Little Man happily got stuck in and even managed to stay within the outline most of the time! The paints are water based so wash out of the brush and off hands easily (they are permanent once dry so wear old clothes or an apron whilst painting!)

Once you have finished colouring your picture you have to leave it to dry flat overnight.

Once the paint is completely dry pin another quarter over the top. You should be able to see your painted picture through the fabric enough to be able to trace an outline. Use a sharp pencil to lightly sketch the outline allowing approximately 2cm around the edge of the picture. Don't worry about following the picture outline exactly, a general outline will be easier to sew!

Then you need to stitch around the outline - by hand or machine - leaving a gap to turn and stuff in a suitable place in the seam. Then trim all the excess fabric away about 5mm from the stitches, snipping into curves and notching corners to reduce fabric bulk.
Leave a little extra seam allowance where you have left the opening to make it easier to stitch up the seam when you have finished stuffing.

Turn your cushion the right way round and press it lightly with a warm iron on the back, easing it into shape.
Now we can stuff it. Fill in the extremities first using small amounts of stuffing at a time. I use a chopstick to help push the stuffing into little spaces. The Little Man joined in on this bit too adding lots of stuffing in the middle.
Make sure you stuff your pillow fairly firmly so it keeps it's shape - for a pillow this size you will need about 200g of toy stuffing.
When you have finished stuffing, stitch up the opening.
The Rocket Pillow is now ready for lift off!!!!


I finished off our pillow with a label, written with the Dylon marker pen and blanket stitched in place on the back of the pillow - just a little reminder that we made this together. I hope it's something he will keep and cherish for years to come!
OK - I cheated a little teeny bit with this month's Creative Budget - the fabric and paints came in at a few pence more than my £15 budget and I used toy stuffing I already had, BUT we still have half a metre of calico and plenty of fabric paint left for another project or two. Maybe an alien pillow to go with our rocket? ;-)
Calico can be used for all sorts of projects - how about a personalised P.E bag to take back to school? Or make a simple tote bag and get the kids to decorate it for you. It's guaranteed to bring a smile to everyones face when you fill it with shopping at the supermarket checkout.
Monday, August 06, 2012
#MagpieMonday - Crafty things and Iconic Crockery

It's been a long time since I did a Magpie Monday post! Last week me and the LM had to go into town to do some banking.
As we have been doing a lot of clearing out lately we took a bag of things to donate and took some time to amble around our three charity shops in town...
Look what I found....

A bag full of dinky white wooden curtain rings. I have used larger wooden curtain rings in my craft projects before. These mini ones are very sweet and just begging to be repurposed! I have a great project to share with you at a later date. Plus they only cost £1.50 for a bag of 40!!!

I love this vintage (1977) pattern book. Norweave orginated, as you might expect, in Norway and is a form of counted tapestry worked on canvas with wool and was very popular in the 70's and early 80's. This book is filled with adaptations of traditional designs (although, to be fair I think they are more 70's retro glamour than traditional Norwegian folk design!)in beautiful bright colours. I haven't done any tapestry work for a while and I really like a couple of the designs in this book So I will be on the look out for some suitable tapestry canvas and wools for stitching! Might be a nice winter evening project.
 | |
| love the vibrant colours of this cushion! |

I also found this lovely set of red wooden 4mm double pointed needles for 65p - they are longer length ones so are perfect for knitting cosy hats in the round. Another winter project!

And finally, my most interesting item. I found this plate for £1.00 in our local Hospice shop. I loved the colours and pattern. I knew it was pretty old - I guessed mid-60's - and couldn't wait to get it home and do a little research!
Turns out it's an early pattern from Kathie Winkle for Broadhurst. "Tyne" was one of her first designs for Broadhurst c.1961. Unlike some of her more collectible designs I didn't manage to find that many examples around the internet so I guess it's not one of her most popular! Clearly influenced by Art Deco styling these items had the basic black pattern stamped on before the colours (in this case lovely pale blue and lemon) were added by hand.
One website warned
As Kathie Winkle is made more notable for being one of the first in-house designers to receive credit on the back stamp, it is important to beware of imitations
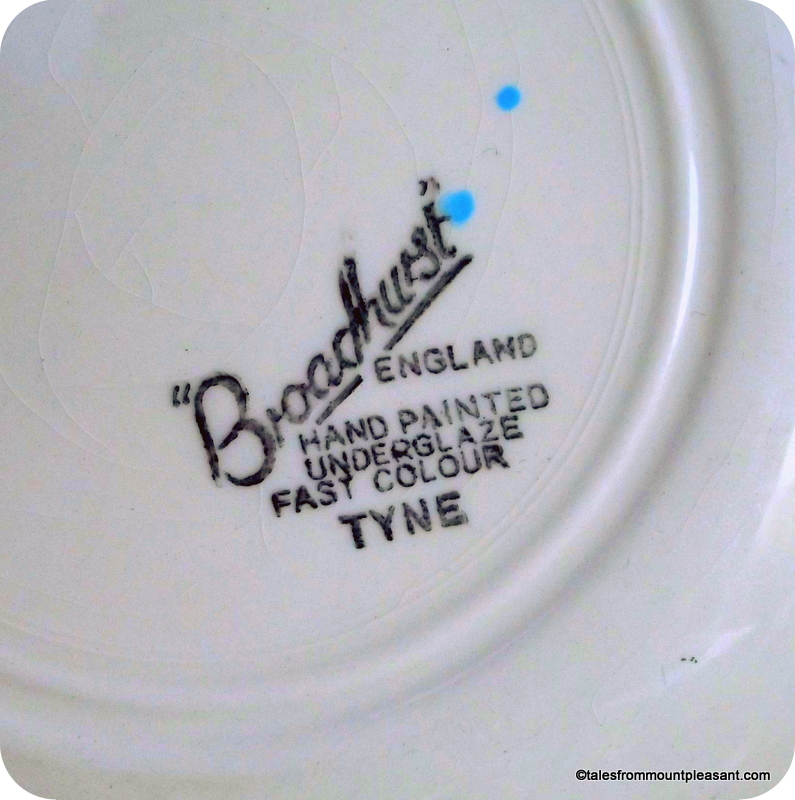
But further research discovered that Broadhurst did not introduce her name on the back until c.1964, after 'Tyne' was first released. So I could have a genuine early piece from an iconic 60's designer or just a copy.
Either way I love it!
 Have you found any great bargains or hidden gems in your local charity shops lately? Why not link up with the lovely Lizzie at Me and My Shadow and her Magpie Monday linky?
Friday, July 13, 2012
Exciting news...
 I have some exciting news to share - I have been selected - along with a dozen or so other fabulous bloggers worldwide - to be a Jane Means Ribbon Stylist Blogger!!!
 For those of you unaware of Jane Means, she is an internationally renowned gift wrapping expert and ribbon designer - what this woman doesn't know about ribbon, quite frankly ain't worth knowing.
I am over the moon to be joining her Ribbon Stylist Blogger team and literally jumped for joy when my lovely postie delivered my big box of ribbons this morning!

Just look! Dotty, spotty, stripey, gingham, stitched and vintage denim ribbons galore! A selection of wired organza ribbons in just the most beautiful colours. There are even some brand new designs I am not allowed to show you yet as they haven't been officially released.

I truly am in ribbon heaven! I am bursting with ideas - lovely things to make, tutorials to share and some ribbon styling ideas around the home to plan.
But first things first, it's my sister-in-laws birthday in a couple of weeks. Her presents are gonna have the best wrapping treatment ever!
*apologies for the not amazing pictures - Little Man was running around today with loaded paintbrushes - I just couldn't risk getting them out of the plastic wrappers!
Sunday, June 03, 2012
Ribbon and Button Corsage - Tutorial

Due to the overwhelming response to Jubilee Ribbon Corsage I made as part of the Abakhan 'Creative Budget' challenge, I have decided to add a tutorial for those of you wish to make one for yourselves. (For those of you who don't or feel they can't, but would love one anyway, keep an eye on my Folksy shop where I hope to be listing some for sale very soon . . . )
So here you go - How to make your very own Ribbon and Button Corsage

Assemble your ingredients
You will need:
12 x 10cm lengths of ribbon
6 x 6cm lengths of ribbon
button centre piece
brooch back
needle and thread
I used ribbon that was 15mm wide. You can use wider or narrower but the effect will be different.

Thread needle with approx 1m of thread, double it up and tie a knot in the end. Take 6 pieces of 10cm ribbon lengths you want to make the first round. You can use the same colour or alternate the colours and/or patterns as wish.
Fold the first piece of ribbon in half an sew a line of small running stitches across the open end.

Do the same with the other five pieces of ribbon. Pull the thread tight to gather the ribbon petals and stitch the last piece to the first to form a circle. Secure with a couple of stitches making sure the thread ends up on the correct side of the work to begin the next row of petals.
Repeat this process for the second round of petals but once you have secured the circle, stitch through the two layers of petals to hold them in place. Try and keep the stitches fairly small and close to the centre but don't worry too much as they will be covered by the next layer...

The third round is worked in exactly the same way but using the shorter lengths of ribbon. Join the circle, secure the petals and stitch into place.

Now add your button centre piece. Use one big focal button or layer up two or three for a different look. Make sure your centre piece is big enough to cover up the stitching on your ribbon petals!

Finally stitch your brooch back in place and you're done!
* If you are at all concerned about the security of your stitches or ribbon fraying feel free to add a little fabric glue to the corsage before you attach the brooch back
There you go, couldn't be easier! Try experimenting with different coloured ribbons and different widths too. Why stop at three layers? Start with larger pieces of wider ribbon for the first round - say 16cm lengths - before doing the three rounds shown here for an absolute show stopper of a corsage!

Wednesday, May 30, 2012
A challenge from Abakhan - Creative Budget
Home crafting has seen a boom in popularity over the past couple of years as we are all watching the pennies. I spend a lot of my time making a little money go a long way - whether it's food shopping, clothes for the LM (and sometimes even some for me!), items for my home or gifts for birthdays and Christmas.
Abakhan, the home of cheap fabrics, haberdashery and general crafty loveliness have issued a monthly challenge to the craft blogging community. 'Creative Budget' is all about showing just how far a small budget can stretch.
I was given £15 of credit to spend on the website on items of my choice and make those items go as far as I could. I spent a very enjoyable evening browsing their excellent website, getting ideas. When I spotted these lovely bag handles at a great price I knew exactly what I wanted to make! Taking inspiration from the Great Britain section, celebrating all that is red,white and blue, I picked the following items...
1m Union Jack printed cotton lawn
1m medium weight interfacing
1pr light wood effect plastic bag handles
1 each red, white and blue felt squares
1m 'Jubilee' Braid
5m assorted ribbons
2 Union Jack heart buttons
I couldn't wait to get started with those bag handles. I wanted to create a vintage look and came up with this lovely curvy little number...

I just love the shape of this bag. The side seams are left open part the way down, so you have room to reach in and get at your things and it is room enough to carry all the usuals, (phone, purse, keys, camera, baby wipes, cuddly toy... ) Although you can't really see from the photo, the lovely cotton lawn fabric has a very pale blue stripe and lots of jolly UJ motifs printed across it. I added body to the fabric with some medium-weight interfacing - it strengthens the fine cotton and helps the bag keep it's shape. I could have lined the bag with more UJ fabric (there was more than enough in a metre!) but instead I picked a piece from my stash - a lovely vintage floral print my mother-in-law picked up from a charity shop for me. The red, white and blue flowers were a perfect match for the UJ's and it means my bag is reversible. Two for the price of one!

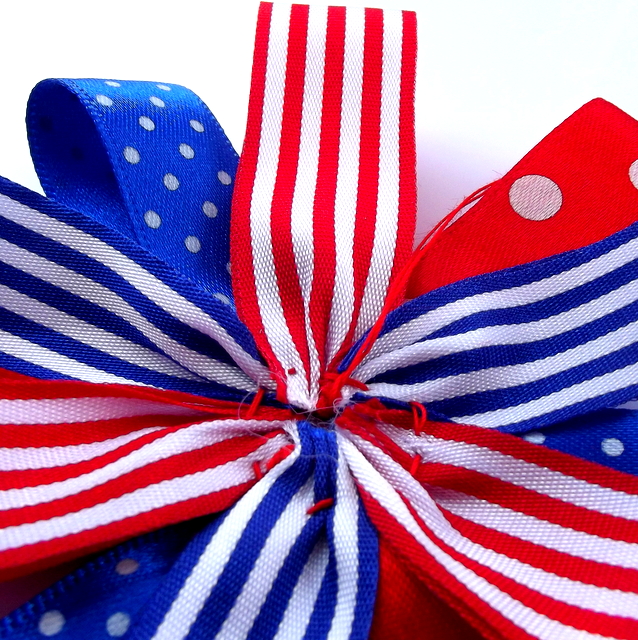
But every bag needs some extra eye candy so I made this lovely red, white and blue ribbon brooch. I think the UJ love heart button in the centre finishes it off perfectly.

It could just as easily be a corsage. I even considered attaching to a clip for the cutest hair piece ever.

With the felt I wanted to create something utilising the UJ print on the cotton fabric and a technique I use a lot in my designs (usually with gingham and felt, like these scented heart decorations) Reverse applique means that instead of adding a fabric panel on top of the main fabric, you add it behind and cut out a window in the main fabric, to frame it It works particularly well with felt as your 'window' doesn't fray. . .
I am using it to take care of my sunglasses but it could just as easily hold a phone or a pocket camera. These cosies are soooooo easy to make with felt. All hand sewn so you don't even need a sewing machine. They would make a great gift for older kids to make for Daddy for Father's Day!

Next up, following a suggestion from the lovely Kerry Lou from Lou Lou's Luxuries is a gorgeous Jubilee Crown made from felt, Jubilee braid and the other UJ heart button. Padded with a tiny bit of toy stuffing, I added some Strawberry scented aromabeads I had for a proper British summer fragrance! A ribbon loop and a key fob from my stash finished it off. Clip it to your bag for a bit of Jubilee charm. (Like the ribbon flower, I could have attached it to a hair comb for my very own cute Jubilee Crown hair piece).


And finally with the rest of the UJ cotton lawn fabric I made a handy shopping bag using the method in the fabulous 'Liberty Book of Home Sewing' It's light enough to fold up really small and pop in your handbag (I might make a little pouch to store it in using the left over felt) yet large enough to carry your groceries home with style - beautifully modelled by the Little Man here. . .
(yes, he IS wearing wellies. . . Don't ask!)

So there you have it, five fabulous items for less than £15 - and I still have some ribbon, braid, felt, fabric and interfacing left to play with! The bags are both machine sewn (but could be sewn by hand if you have the patience), all other items are hand stitched so you don't even need any special equipment. Any one of these items would make a lovely gift for someone special. It's amazing what you can do with a limited budget and a little imagination!
As Abakhan very generously let me have these items for nothing, I would like to pay it forward and offer you, my lovely readers, the chance to win the special Jubilee Crown bag charm and the super useful Union Jack shopper (complete with storage pouch that I will make. Promise). Just leave a comment below, letting me know how you would like me to use my Creative Budget next month? Something for the home? Garden? Something for the kids to play with? Or how about something stylish for yourself? Just let me know!
The winner will be selected at random on Sunday 10th June and announced on the blog after 8pm that day. I will announce on Twitter and Facebook too so you may want to follow/like using the buttons in the column to the right -->
Disclosure - Abakhan gave me £15 of credit to spend on items of my choice from their website. No other payment has been recieved for this post. All items (apart from the shopper) are made to my own designs and patterns and I am happy for you to take inspiration from them to make your own for personal use or to give as gifts but not to sell for profit. Thank you x
Abakhan, the home of cheap fabrics, haberdashery and general crafty loveliness have issued a monthly challenge to the craft blogging community. 'Creative Budget' is all about showing just how far a small budget can stretch.
I was given £15 of credit to spend on the website on items of my choice and make those items go as far as I could. I spent a very enjoyable evening browsing their excellent website, getting ideas. When I spotted these lovely bag handles at a great price I knew exactly what I wanted to make! Taking inspiration from the Great Britain section, celebrating all that is red,white and blue, I picked the following items...
 |
| Doesn't that look lovely? |
1m Union Jack printed cotton lawn
1m medium weight interfacing
1pr light wood effect plastic bag handles
1 each red, white and blue felt squares
1m 'Jubilee' Braid
5m assorted ribbons
2 Union Jack heart buttons
 |
| I am a big fan of spots and stripes and red, white and blue AND hearts... |
I couldn't wait to get started with those bag handles. I wanted to create a vintage look and came up with this lovely curvy little number...

I just love the shape of this bag. The side seams are left open part the way down, so you have room to reach in and get at your things and it is room enough to carry all the usuals, (phone, purse, keys, camera, baby wipes, cuddly toy... ) Although you can't really see from the photo, the lovely cotton lawn fabric has a very pale blue stripe and lots of jolly UJ motifs printed across it. I added body to the fabric with some medium-weight interfacing - it strengthens the fine cotton and helps the bag keep it's shape. I could have lined the bag with more UJ fabric (there was more than enough in a metre!) but instead I picked a piece from my stash - a lovely vintage floral print my mother-in-law picked up from a charity shop for me. The red, white and blue flowers were a perfect match for the UJ's and it means my bag is reversible. Two for the price of one!

But every bag needs some extra eye candy so I made this lovely red, white and blue ribbon brooch. I think the UJ love heart button in the centre finishes it off perfectly.

It could just as easily be a corsage. I even considered attaching to a clip for the cutest hair piece ever.

With the felt I wanted to create something utilising the UJ print on the cotton fabric and a technique I use a lot in my designs (usually with gingham and felt, like these scented heart decorations) Reverse applique means that instead of adding a fabric panel on top of the main fabric, you add it behind and cut out a window in the main fabric, to frame it It works particularly well with felt as your 'window' doesn't fray. . .
I am using it to take care of my sunglasses but it could just as easily hold a phone or a pocket camera. These cosies are soooooo easy to make with felt. All hand sewn so you don't even need a sewing machine. They would make a great gift for older kids to make for Daddy for Father's Day!

Next up, following a suggestion from the lovely Kerry Lou from Lou Lou's Luxuries is a gorgeous Jubilee Crown made from felt, Jubilee braid and the other UJ heart button. Padded with a tiny bit of toy stuffing, I added some Strawberry scented aromabeads I had for a proper British summer fragrance! A ribbon loop and a key fob from my stash finished it off. Clip it to your bag for a bit of Jubilee charm. (Like the ribbon flower, I could have attached it to a hair comb for my very own cute Jubilee Crown hair piece).


And finally with the rest of the UJ cotton lawn fabric I made a handy shopping bag using the method in the fabulous 'Liberty Book of Home Sewing' It's light enough to fold up really small and pop in your handbag (I might make a little pouch to store it in using the left over felt) yet large enough to carry your groceries home with style - beautifully modelled by the Little Man here. . .
(yes, he IS wearing wellies. . . Don't ask!)

So there you have it, five fabulous items for less than £15 - and I still have some ribbon, braid, felt, fabric and interfacing left to play with! The bags are both machine sewn (but could be sewn by hand if you have the patience), all other items are hand stitched so you don't even need any special equipment. Any one of these items would make a lovely gift for someone special. It's amazing what you can do with a limited budget and a little imagination!
As Abakhan very generously let me have these items for nothing, I would like to pay it forward and offer you, my lovely readers, the chance to win the special Jubilee Crown bag charm and the super useful Union Jack shopper (complete with storage pouch that I will make. Promise). Just leave a comment below, letting me know how you would like me to use my Creative Budget next month? Something for the home? Garden? Something for the kids to play with? Or how about something stylish for yourself? Just let me know!
The winner will be selected at random on Sunday 10th June and announced on the blog after 8pm that day. I will announce on Twitter and Facebook too so you may want to follow/like using the buttons in the column to the right -->
Disclosure - Abakhan gave me £15 of credit to spend on items of my choice from their website. No other payment has been recieved for this post. All items (apart from the shopper) are made to my own designs and patterns and I am happy for you to take inspiration from them to make your own for personal use or to give as gifts but not to sell for profit. Thank you x
Subscribe to:
Posts (Atom)