
It was the perfect excuse to get on with a little project I have had in the pipeline since last summer when I first saw an amazing book in our local library...
Handknit Your Home by Melanie Porter is chock full of fabulous knitting patterns for your home - and I'm not just talking about the standard cushion covers, throws and blankets (although they were there too) Melanie makes beautiful hand knitted covers for lampshades, vases, chairs and sofas. She has even completely covered a standard lamp with multi coloured stripes - it's like yarn bombing your living room! I fell in love with the book (it's on my Amazon wish list if anyone is feeling generous ;-) ) and in particular the idea of covering an old footstool in lovely textured knitted panels.
 fast forward to February 2014
When Emma announced the CraftBlogClub challenge I just KNEW what I was going to do...
This little footstool came from a local charity shop for £4.50 and the yarn I used is a budget brand - Monsoon by James C Brett that cost me £3.49 and was burning a hole in my stash! I only had one ball - I think I must have been thinking hat or wristwarmers when I bought it - and I hoped it would be enough!
Drafting the pattern
Generally when I knit stuff I am following a pattern but in this instance I needed to work out how many stitches to cast on and how many rows I would need to knit. To do this first you need to measure the footstool so you know what sizes your finished panels need to be. Make a note of these measurements - I decided I would knit a panel that would go over the stool and cover the two long sides and the top and then knit to small panels for either end. My large panel would need to be 41cm by 33cm and the 2 side panels 8cm x 25cm.
Then you need to refer to the tension details for your yarn - this one was 18sts x 24 rows on 5mm needles to produce a 10cm x 10cm square. You can knit up a tension square to confirm this if you wish but my tension tends to be spot on so I didn't bother this time.
To calculate the number of stitches to cast on I did this...
width = 33cm or 3.3 x 10cm this yarn knits up at 18st to 10cm so I multiplied 18 by 3.3 to get the number of stitches I would need to cast on : 59.4 (round it up to the next whole number - 60)
The number of rows is not so important - on a project like this you can just knit until it's long enough then cast off! But if you are interested I worked it out like this...
length = 41 cm or 4.1 x 10cm (tension square) at 24rows to 10 cm you need to multiply 24 x 4.1 = 98.4 (rounded up to 99)
Now you have your number of stitches to cast on and the number of rows you need to knit to make your panel the required size you can think about a stitch pattern. I have an excellent book - The Knitting and Crochet Bible - which has hundreds of stitch patterns to choose from! Of course there is nothing to stop you just straight knitting but I do like a challenge...
I chose a pattern called 'King Charles Brocade' which uses moss stitch to make a diamond pattern. The book very helpfully tells you what the stitch repeat is - in this case multiples of 12 +1stitch. Referring to my earlier workings I could see that I would need to cast on 60 sts which as luck would have it is 5x12. The extra stitch to make the pattern work wasn't going to make a huge difference to the overall width!
Enough maths - now it's time to knit!

It took me a little longer than I had hoped - mainly because of the stitch pattern needing a fair bit of attention! - and yes I DID run out of yarn half way along the second side panel (the side panels I decided to knit plain garter stitch to speed things up a bit!) but I found an scrap in my stash that kind of blended ok and was a similar weight. It worked out ok!
Covering the stool

Before stitching the panels together I pinned them all into place on the stool - just to make sure they fitted ok - I wanted a snug fit so stretched the pieces a little, pinned them all down and then sprayed them with some water before leaving them to dry over night.

Once dry I removed all the pins and stitched the pieces together using yarn and an over stitch

Then I popped the cover back on the stool - as you can see it needed pulling into shape again!

I stitched the cover to the fabric of the stool to hold it firmly in place and give it a neat finish. Obviously if I ever want to wash the cover I will have to cut away this stitching and then re-stitch it back on once it's clean but it's worth it!
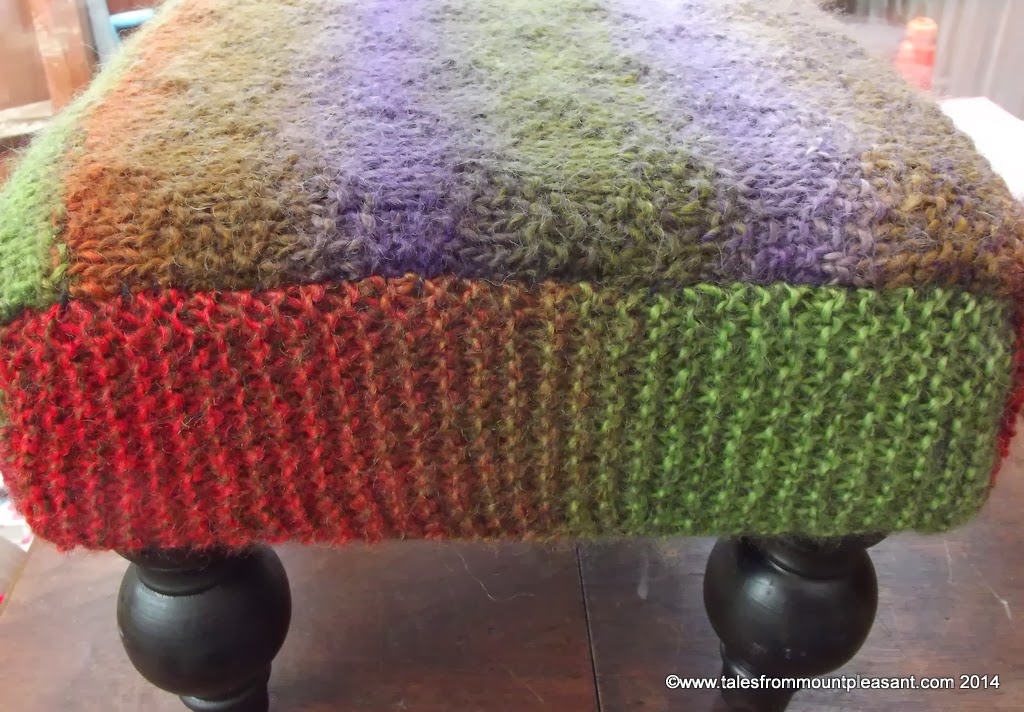


My finished stool looks amazing and I can pretty much guarantee no-one else has one like it!
Thank you Melanie for providing me with the inspiration and thank you Emma for setting up the challenge that enouraged me to get this project finished.
Now I am looking around for the next household object I can yarn bomb!!
Why not nip over to Frugally Peachy's Craft Blog Club I Re-love You Challenge Reveal post and see what amazing upcycles everyone did!
#craftblogclub 'meets' every Tuesday evening from 7-8.30pm on Twitter, sharing tips, ideas and fabulous crafty blog posts! For craft bloggers and lovers of craft blogs alike - do come and join us, we'd love to meet you!
Err wow! That's amazing! I wouldn't even know where to begin when it comes to knitting.
ReplyDeleteThank you Maxine - it's really not that hard once you get the hang of it :-)
DeleteRichard wants one.
ReplyDeleteKeep an eye out for a footstool on charity shops and find some yarn you like and maybe he'll get one ;-) you could have a go a crocheting a granny square cover... ;-)
DeleteI really think this is amazing. I don't knit so it does look terribly clever and complicated! I'm truly impressed.
ReplyDeleteLol Amanda - really not so clever but I have been knitting for best part of thirty years now... (man, that makes me feel old!!)
DeleteThis is just amazing Anthea! The yarn is just so beautiful and it looks so cosy! I knew I'd love the finish article! I'm so tempted to do something like this on a stool I have! xx
ReplyDeleteDo it Emma - I know you cam knit! Once you've worked out how many stitches and rows you need you can create anything! I am thinking stripey seat covers next... :-)
Delete