Showing posts with label recycle. Show all posts

Tuesday, March 31, 2015

Upcycled Jeans Patchwork Quilt (part 1)


Debenhams are celebrating the launch of a brand new jeans page on their website by challenging crafty bloggers to come up with ideas for upcycling their old jeans.


Well as I have recently lost rather a lot of weight (hurrah, finally starting to shift the mumtum!) I have a pile of old, worn out jeans just ripe for upcycling so this challenge was perfectly timed.


Thursday, October 03, 2013

DIY T-Shirt Yarn - joining short pieces

I have some exciting news! I have been asked to participate in a crafty workshop at this year's Forest Showcase!

Lydney Dial-a-Ride - a local charity I have close connections with - have an entire marquee at the show with the aim of educating people about what charity shops actually do! What happens to the items you donate and where the money raised from sales is spent. The manager, Louise, has asked a few of us crafty types to come along and show people that you can do so much more with your charity shop purchases than just wear them off the rail...

My demo will be on recycling old clothes and turning them into beautiful things for your home.

And where better to start than with how to make Tshirt yarn!

The concept of recycling tshirts into a yarn to make something new with has been around for a while. There are lots and lots of tutorials out there showing you how to create a continuous length of yarn from a tshirt (here's a very simple tutorial from Mollie Makes  )

But these tutorials assume that your tshirts are essentially a tube with no side seams. This method of tshirt construction is more commonly seen in men's tshirts as women's tend to be shaped to accommodate (or accentuate) our curves so unless you are lucky enough to have a fella who doesn't mind you shredding his trusty tees finding the right shirt for this method can be tricky.

I have been scouring local charity shops for this project and so far have found only one shirt with no side seams so I really needed to find a way of joining the strips together securely but not too bulky. Machine stitching them together is time consuming so why not try this method...

First you will need to cut your tshirt into panels - cut across the body, just under the armpits. Cut the hemmed piece off the bottom and cut the two side seams out. This should leave two rough squares of fabric.


 Cut these into strips across the width of the fabric. You can cut the strips as wide or as narrow as you want - it depends on the project you have in mind. Just remember that the wider the strip, the chunkier the finished yarn will be (and the less you will get from each shirt!).  I wouldn't recommend cutting any narrower than about 1/2" or 12mm...


 Take two strips and lay them end to end - don't worry too much if they are not exactly the same width... 


Cut a small slit in the ends of your fabric strips


Take one fabric strip (1) and pass it through the slit in the other fabric strip (2)  ...


...then take the other end of strip 1 and pass that through the slit you cut in it...


... and pull!

This creates a good firm join. Once you have joined all the strips you can then pull the strip as for the continuous lengths to create the yarn.

Now you have no excuse not to recycle all those old tshirts whether they have side seams or not!

the start of a t-shirt yarn crochet rug using 10mm hook

I have really enjoyed turning old tshirts into yarn and it is intensely satisfying then turning that yarn into something completely different.  I hope to show off a few finished articles very soon and am planning a couple of simple tutorials - including the crochet rug pictured above!

In the meantime - why not pop along to the Forest Showcase on Sunday 6th October at Speech House, Forest of Dean, join me on the hay bales and learn how to turn rags into rugs! 


Tuesday, May 07, 2013

NEW :: Upcycled wool fabric needle books

You may remember a few weeks back I showed you a lovely wool fabric skirt I picked up from a charity shop £1 rail. Although I didn't know exactly what I was going to make with it I knew the lovely fabric would lend itself well to a variety of projects and the colour offers the perfect backdrop for many different colours

The first thing I made was a cute little needle book as a gift for my dad who loves to do cross stitch.


I used some lovely ribbon from my Jane Means stash for the button loop and decoration. If you watched the Great British Sewing Bee you might recognise the narrow grey stitched ribbon - it's the same one Anne used to great effect embellishing her blouse in episode 1 .  I adore the simple red, grey and white stripe ribbon too - a decorative touch without making it girly!  The button came from Nan's button box.


I lined it with a pale blue and white striped cotton and made the 'pages' with black felt.  Then I finished off the gift by filling it with a selection of gold plated needles.

He loved it!

So did I!! In fact I loved it so much I made a couple more...


This one uses Jane Means stitched gross grain ribbon in sage and the same narrow ribbon as before but this time in green. The lining fabric from my stash matches beautifully - right down to the stitched lines as part of the pattern!


I have used pale green felt for the pages and another vintage button holds it all together.


On this needle book I have used Jane's beautiful red ribbon with grey polka dots - it looks like it was made to go with this fabric!  The narrow stitched ribbon comes in red too and once again has been used for the button loop. A lovely etched button and matching red top stitching finish this one off nicely.


Inside I have lined it with gorgeous Lama Love by Monaluna Organics sold by one of my favourite fabric suppliers Seamstar (stay tuned - I have an upcoming blog post all about their great new monthly craft club!) It's cute and quirky and goes with the grey and red theme perfectly! Bright red felt pages hold your needles safely.

Both these needle books are available now from my Folksy shop priced £8.00 each. I am still offering free post and packing on ALL UK orders through Folksy so why not go take a look?

I feel there are few more needle books to be born from this fabric/ribbon/vintage button combo yet - perhaps you have a colour combo you'd like to see? I may have to create some matching pin cushions too...

Monday, April 29, 2013

Wonder Wool Wales 2013

This weekend we went off to Builth Wells for Wonder Wool Wales - a great show celebrating all that is woolly.  I wrote about it last year here so I won't waffle on this time but here are some pictures to inform and inspire!


As ever I came home all fired up and eager to try new things. There was a lot of recycling/upcycling going on which always inspires me. I have already been practising needlefelting but I really want to work creating my own fabric by wet felting (did you spot some of the amazing felt clothing in the slideshow?). I am even going to dig out the drop spindle I bought last year and have another go at spinning my own yarn! I'll let you now how that goes... ;-)

We are already planning our trip next year.

Maybe you could come too...?

Monday, February 25, 2013

Magpie Monday - Clearing out the cellar

It's been a while since my last Magpie Monday post but I have had a bumper crop of finds this week so I thought it would be nice to share.

On Saturday we went over to the Shambles in Newent - it was a bit sad as after our three year lease ended last September we decided to close the motorbike shop and concentrate on the original premises in Coleford. The cellar beneath the shop had accrued all sorts of junk and needed clearing and the landlord had given us some grace as it was a lot of work but it was time to take the bull by the horns and finish the job . . .

But, as they say, every cloud has a silver lining, and we uncovered some little gems leftover from the building's previous incarnation as a 'Museum of Victorian Life' hiding underneath the junk just begging for some love!

Check out this beauty!  It needs a damn good clean, maybe a coat of paint (i'm thinking white or maybe pale green) and a new top but it would have been skipped had I not grabbed it! I have no idea how old it is - I know a lot of the 'Victoriana' in the museum was made for the museum and 'aged' - but quite frankly I don't care! I love all the little details and I can't wait to turn it into the conversation piece it deserves to be.


   I also found a wooden curtain pole with lovely ornate finials and these giant brass curtain rings. One of the finials and the pole itself were split so I rescued the other finial to add to my collection of 'interesting wooden things' (yes, really) 
I really don't know what to do with the curtain rings - they could make a very impressive bangle stack!


Also I came across a number of bevelled mirrors. Unfortunately most of them were cracked or badly chipped but I did manage to salvage this one. (Please ignore me/yucky conservatory roof - ooo look, cute kitten! )  It's quite large and I haven't decided where it's actually going to go. I suspect it may be too heavy for our rubbish plasterboard internal walls which narrows possible hanging places down a bit. I'll let you know on that one.

But that's not all. My local hospice charity shop turned a couple of absolute bargains this week.


A lovely grey wool skirt off the £1 rail. Not for wearing but lots of gorgeous pure wool fabric to play with. I am thinking lavender hearts and birds with prety pastel ribbon and mother of pearl button trim (keep an eye on my Folksy shop if you like the sound of that!)  Maybe a bag and purse and, if there is enough a hat for the Little Man.


opaque white vase/bowl/goblet/Holy Grail type thingy

This was 25p. That's right. 25p. It had to come home with me. I have no idea what it's actual purpose is but I'm absolutely sure it will get used as a prop in my product photos . . .
 (if anyone actually does know what it's true purpose is, please tell)


linking up with Missie Lizzie's Magpie Monday

Me and My Shadow

Friday, January 11, 2013

Folksy Friday - Stow it away

Definition of stow

verb

[with object and adverbial] pack or store (an object) carefully and neatly in a particular place


Now all the Christmas decs are back in the loft I have an overwhelming urge to get some order back into my home. Luckily I found some lovely items on Folksy to help me stow my clutter!


I am always losing my keys so this key holder made from an old oak cupboard door by skiprat creations would be an ideal addition to my kitchen! (I love the vintage key embellishment - I wonder if it fits the keyhole in the door?)


This beautiful and functional shelf is designed by Gafyn Owen of MijMoj Contemporary Furniture Design I love the dip in the shelf for loose change or keys and the inclusion of the single stem flower vase into the design is inspired!


This one off from Revival Furniture would make a great storage box for toys - quirky enough for kids to love and stylish enough to stay in the living room! Plus it doubles up as a handy stool.


I just love this idea! Vintage vinyl becomes useful book end in the hands of When the Music's Over who also produce clocks, letter racks and even jewellery from old records and tapes. This is repurposing at it's best!


Keep all your bills and lists in order so they are there when you need them with this fab wooden star peg organiser from Emma Lane Designs 


I love these cute owl print storage baskets from Alexia Claire . They are quite dinky but the larger of the two would be perfect for storing my latest knitted socks WIP!


There are more storage and organisation ideas on my pinterest board here

Enjoy!

Thursday, August 30, 2012

Ribbon scraps and gravy tubs...


Here's a quick and easy way to use up those ribbon scraps, recycle empty gravy granule tubs and organise your desk/craft space all in one go.


Measure around your chosen pot/canister/tub and cut lengths of ribbon just slightly longer (to allow for an overlap). Attach the ribbons to the container using narrow double sided sticky tape for an almost instant  makeover! You can use fabric glue if you prefer but you need to allow a little extra time for the glue to dry.

And that is it! I told you it was easy!

Keep hold of the lids and use your pretty decorated tubs to store craft supplies - buttons, ribbons, beads - or they make a lovely addition to your desk for paperclips or rubber bands. Without the lids they make great pen pots!


I used a gorgeous selection of ribbons in autumnal colours from my Jane Means ribbon stash for this stripy  pencil pot.


Alternatively wrap the canister in a lovely piece of fabric and glue in place. Add coordinating ribbon to the top and bottom to cover the fabric edges.


Chocolate brown and burnt orange Jane Means ribbon coordinates beautifully with this lush Saffron Craig owl print fabric. The taller canister lends itself beautifully to showing off this collection of wooden knitting needles! (my mums . . . although I may just *forget* to give them back!)


I think they look great and they are really are so easy peasy to do I may end up with ribbon covered storage pots all over the house.
I wonder if the Other Half would like one for his spanners . . .

Monday, August 06, 2012

#MagpieMonday - Crafty things and Iconic Crockery


It's been a long time since I did a Magpie Monday post! Last week me and the LM had to go into town to do some banking.
As we have been doing a lot of clearing out lately we took a bag of things to donate and took some time to amble around our three charity shops in town...


Look what I found....


A bag full of dinky white wooden curtain rings. I have used larger wooden curtain rings in my craft projects before. These mini ones are very sweet and just begging to be repurposed! I have a great project to share with you at a later date.  Plus they only cost £1.50 for a bag of 40!!!


I love this vintage (1977) pattern book. Norweave orginated, as you might expect, in Norway and is a form of counted tapestry worked on canvas with wool and was very popular in the 70's and early 80's. This book is filled with adaptations of traditional designs (although, to be fair I think they are more 70's retro glamour than traditional Norwegian folk design!)in beautiful bright colours. I haven't done any tapestry work for a while and I really like a couple of the designs in this book  So I will be on the look out for some suitable tapestry canvas and wools for stitching! Might be a nice winter evening project.


love the vibrant colours of this cushion!


 I also found this lovely set of red wooden 4mm double pointed needles for 65p - they are longer length ones so are perfect for knitting cosy hats in the round.  Another winter project!


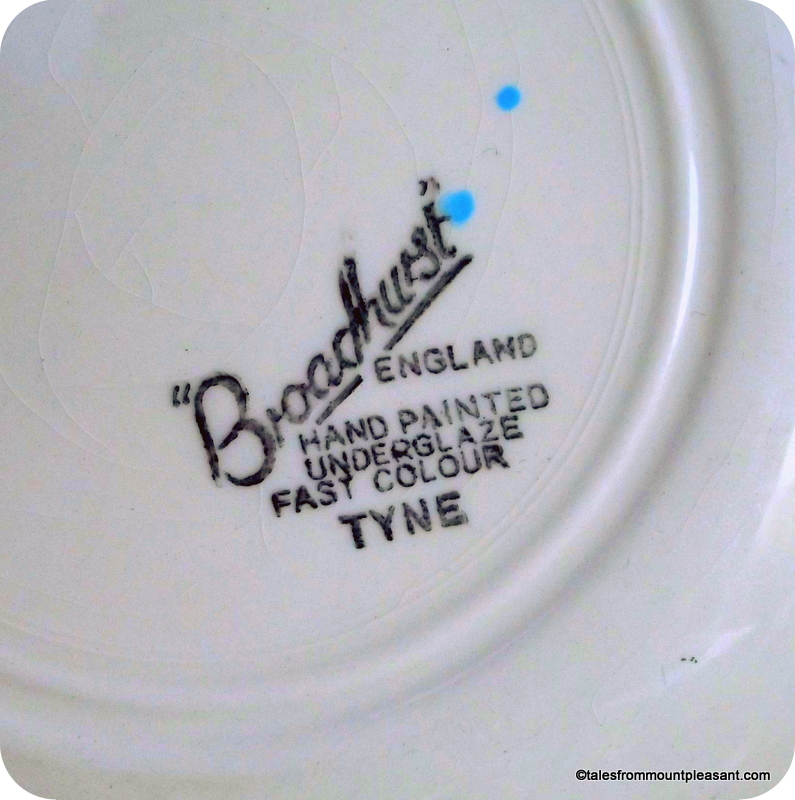
And finally, my most interesting item. I found this plate for £1.00 in our local Hospice shop. I loved the colours and pattern. I knew it was pretty old - I guessed mid-60's - and couldn't wait to get it home and do a little research!
Turns out it's an early pattern from Kathie Winkle for Broadhurst. "Tyne" was one of her first designs for Broadhurst c.1961. Unlike some of her more collectible designs I didn't manage to find that many examples around the internet so I guess it's not one of her most popular! Clearly influenced by Art Deco styling these items had the basic black pattern stamped on before the colours (in this case lovely pale blue and lemon) were added by hand.


One website warned
As Kathie Winkle is made more notable for being one of the first in-house designers to receive credit on the back stamp, it is important to beware of imitations


But further research discovered that Broadhurst did not introduce her name on the back until c.1964, after 'Tyne' was first released.  So I could have a genuine early piece from an iconic 60's designer or just a copy.


Either way I love it!


Me and My ShadowHave you found any great bargains or hidden gems in your local charity shops lately? Why not link up with the lovely Lizzie at Me and My Shadow and her Magpie Monday linky?

Tuesday, August 02, 2011

Crochet... I'm hooked!

I know, I know - I am probably one of the last to jump on this particular bandwagon but a week or so ago I picked up a crochet hook and learned how to crochet. It's something I have been meaning to do for a while. I mean I have been knitting for years (well decades actually...) and I have had a go at pretty much everything - cabling, fancy stitches, colour, patterns, jumpers, jackets, socks, baby clothes...quite a lot of baby clothes come to think of it, more socks, bags etc etc. But for some reason the lure of the crochet hook has never attracted me that much.

Until now.

I blame this...

This - if you haven't seen it before - is a brand new magazine dedicated to handmade living. It's chocca full of wonderful ideas, inspiration, interviews, makes and general handmade loveliness. It is right up my alley and so refreshingly gorgeous it surely must be almost illegal.... (I am assured it isn't)

So, yes, I am absolutely in love with Mollie Makes. I dream that one day me or one of my makes might feature within it's beautiful matt paper covers. In the meantime I lust after dinky felties and crocheted flowers, scrummy interiors and to-die-for studio spaces (imagine a space totally dedicated to crafting...no toys, no teetering piles of bike magazines, no spending half an hour tidying up before I can get anything out and then having to put it all away again so the Little Man can do Play Doh... oh, a girl can dream),

You see it was the flowers that did it.My Other Half suffers really badly from hay fever so real flowers in the house are pretty much a no-no (I do manage to slip some in when he's not paying attention on very rare occasions...) I'm really not a fan of chintzy, floral fabrics, preferring more stylised designs. But when I saw that gorgeous cover and knew that I could have a house full of flowers I loved without making his nose twitch!

So I had to learn how to crochet!  With the help of this tutorial I got the basics together fairly quickly (although I feed the yarn like I knit, with my right hand not my left. I'm sure I will work it out eventually!) and this was my first flower attempt...


Not bad but far from perfect. So I kept at it. Last night I felt confident enough to try an ACTUAL PROJECT. Coincidentally (not that I believe in coincidence mind you!) one of my fave reads the Angel Eden blog posted a tutorial a few days ago that was absolutely perfect - a Crochet Jar Cover - I could make something pretty with my new found skill and find another use for an old jam jar!

Wanna see? Of course you do...


Now it's pretty safe to say I am hooked - I love it! The simplicity. The speed at which projects grow. Most of all I love the way crochet lends itself to itty bitty projects so much more than knitting! It is much easier to pick up and put down when the Little Man demands attention and SOOOO much easier to pick up the single stitch if the hook falls out. If you have ever tried picking up an entire row of knitting when the needle gets pulled out you'll know what I mean...

So thank you Mollie Makes for inspiring me where all others have failed, and Abi at Angel Eden for the great tutorial :)

Monday, June 06, 2011

#MagpieMonday - My FREE Kitchen

Me and My ShadowHaven't done a Magpie Monday post for a few weeks but this week I became the ultimate magpie and managed to pick up a whole new look for my kitchen - FOR FREE!!!!
I came home from shopping the other day to see a couple of cupboard doors lying on my neighbours lawn.
I knew she had the same original fitted kitchen in her house as I had in mine except hers was a nice pale beech effect whilst mine was a dingy silver grey. I have hated it ever since we first moved in.
The cupboards themselves are sound and sturdy so there was no justification to replace the whole lot (even if we could have afforded to). The hinge on the corner cupboard broke off about 2 years ago and that door has been propped up against the gap ever since (I know, I know - I don't know how I put up with that for so long either!)  I even began painting over them but as ever it was a spur of the moment thing that I started but never finished...
So I wasted no time knocking on her door - well sometimes you have got to take the bull by the horns and I am not proud...
'So are you getting a new kitchen then?'
'Yes' says neighbour, with a grin.
'What are you going to do with the old one? If you're just going to get rid of it would you mind if I nabbed the doors?'  Not a problem, says my (lovely) neighbour. She even tells me to add the old ones to her pile of rubbish and she'll get rid of them for me!

Now there were a couple of snags - the main one being that her kitchen is the mirror image of mine - this means that I had to swap all the hinges around and now all my cupboards open on the opposite side to previously which is going to take a little getting used to. The only one I couldn't do this with was the the narrow wall cupboard in the corner so I had to put the door on upside down with the handle at the top. As this is used as the medicine cupboard it's not the end of the world  - there's no way the Little Man will be able to reach it to open it - even I have to stand on tiptoes!

The little panel that goes under the sink needs the brackets refitted - the holes are just a few millimeters out and  the panel that sits under the cooker is missing coz next door had a free standing cooker not a fitted one - but that's nothing a bit of cream gloss can't sort out.

I think you'll agree the finished result is a massive improvement!
And yes, I did it all myself!!

Now all I need to do is paint over the 'sunny' yellow (what was I thinking?) with a nice country cream and source some new flooring from somewhere. Then maybe, as I have saved so much on the kitchen I might add a few new accessories - from the charity shops of course.
Related Posts Plugin for WordPress, Blogger...
Blogging tips